Custom post types allow WordPress developers to extend the functionality of their website beyond standard posts and pages. By adding a ‘Services’ custom post type, you can display your business offerings in a more organized and customizable way. Moreover, by adding custom meta boxes, you can include additional details about each service, such as pricing, duration, or related services. In this guide, we’ll walk through the process of creating a ‘Services’ custom post type and adding custom meta boxes to enhance it.
Step 1: Register the ‘Services’ Custom Post Type
To create a new custom post type, you’ll need to register it using the sajdoko_register_post_type function in your theme’s functions.php file or in a custom plugin. Here’s a simple way to create the ‘Services’ custom post type:
// Register the 'Services' Custom Post Type
function sajdoko_register_services_post_type() {
    $labels = array(
        'name'               => 'Services',
        'singular_name'      => 'Service',
        'menu_name'          => 'Services',
        'name_admin_bar'     => 'Service',
        'add_new'            => 'Add New',
        'add_new_item'       => 'Add New Service',
        'edit_item'          => 'Edit Service',
        'new_item'           => 'New Service',
        'view_item'          => 'View Service',
        'all_items'          => 'All Services',
        'search_items'       => 'Search Services',
        'not_found'          => 'No services found.',
        'not_found_in_trash' => 'No services found in Trash.',
    );

    $args = array(
        'labels'             => $labels,
        'public'             => true,
        'has_archive'        => true,
        'supports'           => array( 'title', 'editor', 'thumbnail' ),
        'menu_icon'          => 'dashicons-hammer',
        'show_in_rest'       => true,
    );

    register_post_type( 'services', $args );
}

add_action( 'init', 'sajdoko_register_services_post_type' );
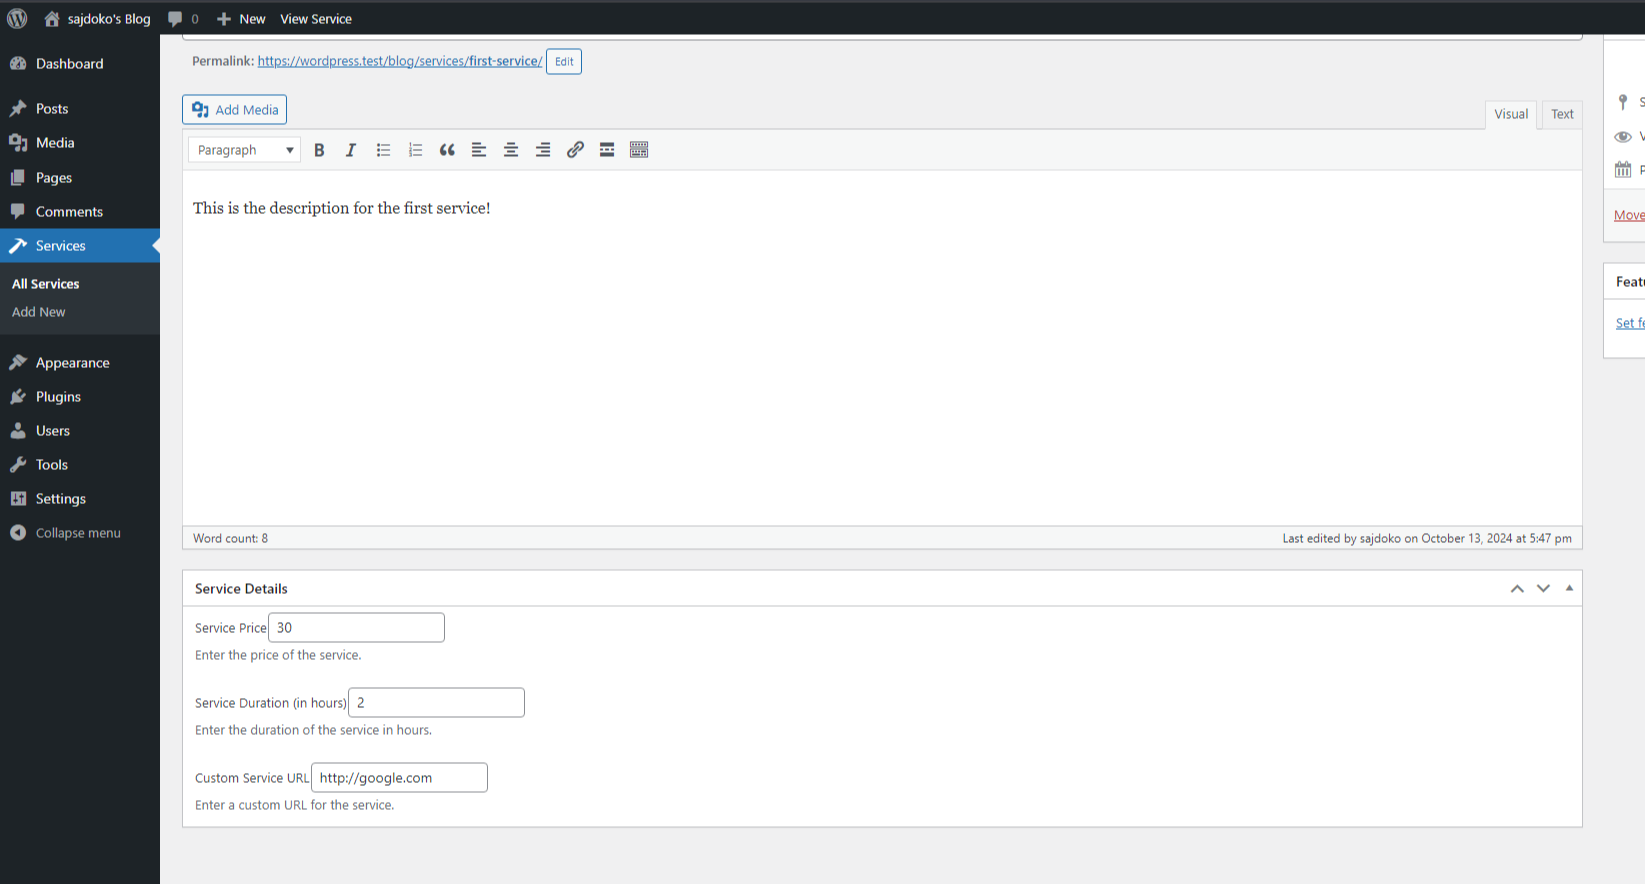
With this code, we register a ‘Services’ post type that will appear in the WordPress dashboard. The post type supports the title, editor, and featured image, which are the most common elements you’ll want when creating a service entry.
Step 2: Add Custom Meta Boxes for Additional Service Details
Next, we’ll add custom meta boxes to the ‘Services’ post type. These meta boxes will store additional information such as service price, duration, and a custom URL (if necessary). To do this, we need to add some more code to our functions.php file or custom plugin.
// Add Custom Meta Boxes
function sajdoko_add_service_meta_boxes() {
    add_meta_box(
        'service_details',       // ID of the meta box
        'Service Details',       // Title of the meta box
        'sajdoko_render_service_meta_box',  // Callback function to render the meta box
        'services',              // Post type
        'normal',                // Context (normal, side, advanced)
        'default'                // Priority
    );
}
add_action( 'add_meta_boxes', 'sajdoko_add_service_meta_boxes' );

function sajdoko_render_service_meta_box( $post ) {
    // Add a nonce field for security
    wp_nonce_field( 'services_save_meta_box_data', 'services_meta_box_nonce' );

    // Retrieve current values
    $price = get_post_meta( $post->ID, '_service_price', true );
    $duration = get_post_meta( $post->ID, '_service_duration', true );
    $url = get_post_meta( $post->ID, '_service_url', true );

    // Render the meta box fields
    echo '<label for="service_price">Service Price</label>';
    echo '<input id="service_price" name="service_price" type="text" value="' . esc_attr( $price ) . '" />';
    echo '<p class="description">Enter the price of the service.</p<';
    echo '<br<';

    echo '<label for="service_duration">Service Duration (in hours)</label>';
    echo '<input id="service_duration" name="service_duration" type="text" value="' . esc_attr( $duration ) . '" />';
    echo '<p class="description">Enter the duration of the service in hours.</p<';
    echo '<br<';

    echo '<label for="service_url">Custom Service URL</label>';
    echo '<input id="service_url" name="service_url" type="text" value="' . esc_attr( $url ) . '" />';
    echo '<p class="description">Enter a custom URL for the service.</p<';
}
This code adds a meta box titled “Service Details” to the ‘Services’ post type. It provides fields for entering the price, duration, and URL for each service. Next, we need to save this data when the post is saved.
Step 3: Save Meta Box Data
Now that we’ve created the custom meta boxes, we must ensure that the data entered is saved when the post is updated or published. Add the following code to handle this:
// Save Meta Box Data
function sajdoko_save_service_meta_boxes( $post_id ) {
    // Check if our nonce is set
    if ( ! isset( $_POST['services_meta_box_nonce'] ) ) {
        return;
    }

    // Verify the nonce
    if ( ! wp_verify_nonce( $_POST['services_meta_box_nonce'], 'services_save_meta_box_data' ) ) {
        return;
    }

    // Check the user's permissions
    if ( ! current_user_can( 'edit_post', $post_id ) ) {
        return;
    }

    // Make sure the input fields are set
    if ( isset( $_POST['service_price'] ) ) {
        $service_price = sanitize_text_field( $_POST['service_price'] );
        update_post_meta( $post_id, '_service_price', $service_price );
    }

    if ( isset( $_POST['service_duration'] ) ) {
        $service_duration = sanitize_text_field( $_POST['service_duration'] );
        update_post_meta( $post_id, '_service_duration', $service_duration );
    }

    if ( isset( $_POST['service_url'] ) ) {
        $url = esc_url( $_POST['service_url'] );
        update_post_meta( $post_id, '_service_url', $url );
    }
}

add_action( 'save_post', 'sajdoko_save_service_meta_boxes' );
This ensures that the data entered in the meta boxes is saved as post meta, so you can later retrieve and display this information when needed.
Step 4: Display Custom Meta Box Data on the Front End
Now that we have a custom post type with custom meta fields, we need to display this data on the front end of the website. This is typically done by customizing your theme’s template files. You can modify the single post template for the ‘Services’ post type, which can be done by creating a single-services.php file in your theme.
// Display Service Meta Data in Template
$price = get_post_meta( get_the_ID(), '_service_price', true );
$duration = get_post_meta( get_the_ID(), '_service_duration', true );
$url = get_post_meta( get_the_ID(), '_service_url', true );

if ( $price ) {
    echo '<p>Price: ' . esc_html( $price ) . '</p>';
}

if ( $duration ) {
    echo '<p>Duration: ' . esc_html( $duration ) . ' hours</p>';
}

if ( $url ) {
    echo '<p><a href="' . esc_url( $url ) . '">More Information</a></p>';
}
By adding this snippet to your single-services.php template file, you’ll display the price, duration, and URL for each service on the front-end of your website.
Creating a custom post type like ‘Services’ and adding custom meta boxes can greatly enhance how you display specialized content on your WordPress site. This setup allows you to keep your site organized, improve the user experience, and make managing your content more efficient. Once you’ve got this basic setup, you can extend it further with more fields, custom taxonomies, and even advanced search functionality to help your visitors find the services they need.
Looking for more ways to customize WordPress? Check out our guide on custom post type templates for more insights!
