# Introduction
Before we start coding our Collection Products widget, it’s essential to understand how Elementor widgets work under the hood. In this part, we’ll explore the widget architecture, learn about the base class, understand the widget lifecycle, and see how widgets integrate with the Elementor page builder.
# Learning Objectives
By the end of this tutorial, you will understand:
-
- The structure of an Elementor widget class
- Required methods and their purposes
- How widgets are registered with Elementor
- The widget lifecycle from registration to rendering
- Widget controls and how they create the settings panel
- How widgets render content on the frontend
- Best practices for widget development
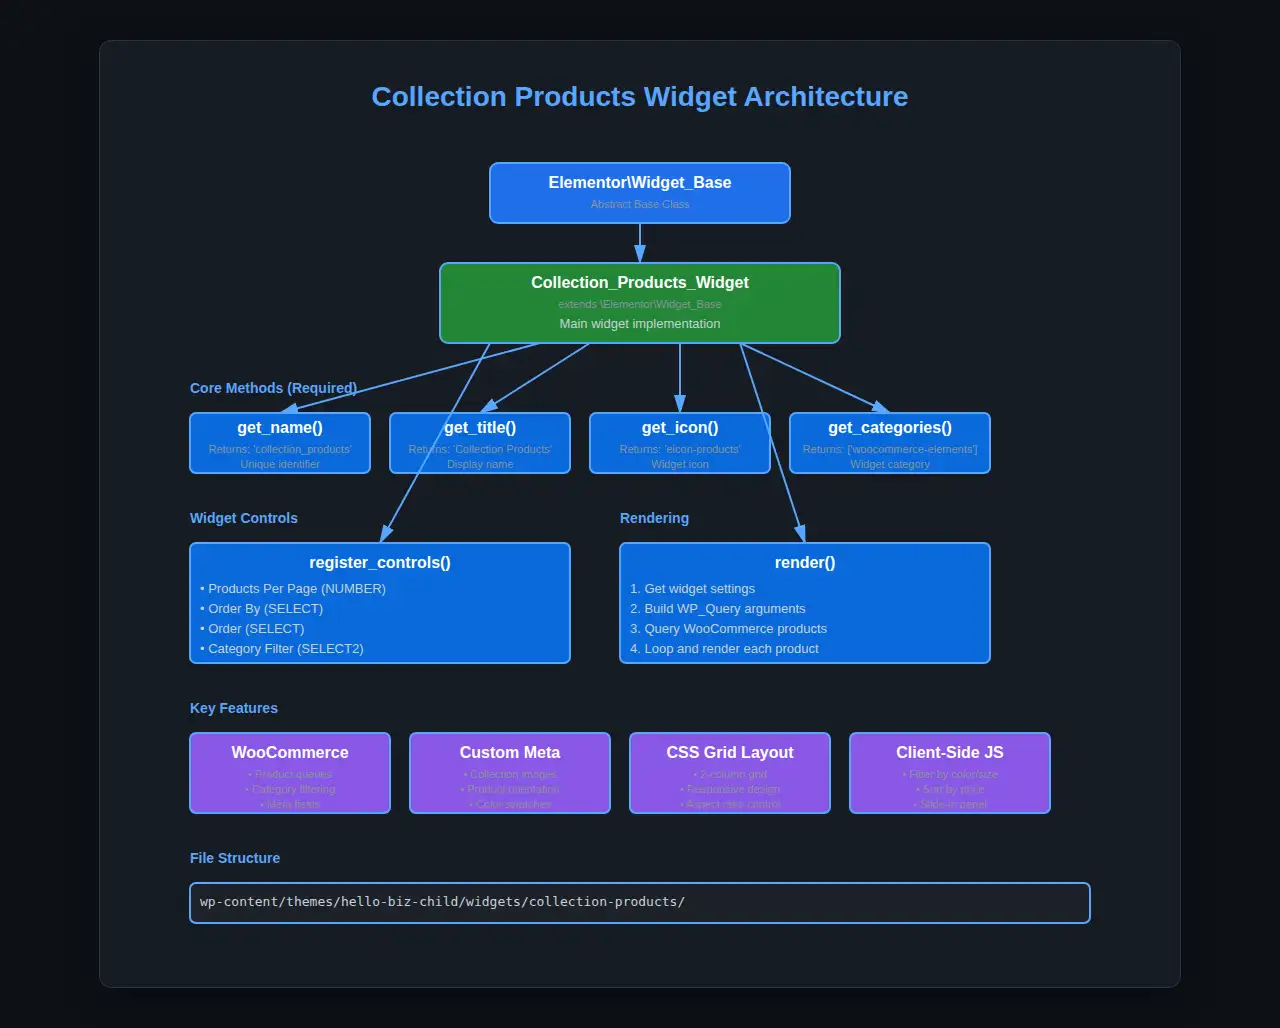
# The Elementor Widget Base Class
All Elementor widgets extend the \Elementor\Widget_Base abstract class. This base class provides the foundation and structure that Elementor expects from every widget.
# Key Concept: Object-Oriented Programming
Elementor uses Object-Oriented Programming (OOP) principles. Your widget is a PHP class that extends (inherits from) the base widget class.
    class My_Custom_Widget extends \Elementor\Widget_Base {
      // Your widget code here
    }
# Required Methods
Every Elementor widget must implement certain methods. Let’s examine each one:
# 1. get_name()
Purpose: Returns a unique identifier for your widget.
  public function get_name() {
    return 'collection_products';
  }
Important Points:
- Must be unique across all widgets
- Use lowercase letters, numbers, and underscores only
- No spaces or special characters
- This name is used internally by Elementor
# 2. get_title()
Purpose: Returns the human-readable title shown in the widget panel.
  public function get_title() {
    return __( 'Collection Products', 'hello-biz-child' );
  }
Important Points:
- This is what users see in the Elementor editor
- Use
__()for translation support - Keep it clear and descriptive
# 3. get_icon()
Purpose: Returns the icon class that appears next to the widget name.
  public function get_icon() {
    return 'eicon-products';
  }
Important Points:
- Uses Elementor’s icon library
- Format:
eicon-{icon-name} - Browse available icons in Elementor’s icon library
- Common icons:
eicon-posts-grid,eicon-products,eicon-gallery-grid
# 4. get_categories()
Purpose: Defines which category panel the widget appears in.
  public function get_categories() {
    return [ 'woocommerce-elements' ];
  }
Available Categories:
basic– Basic widgetsgeneral– General elementswoocommerce-elements– WooCommerce widgets (we’ll use this)theme-elements– Theme-specific widgets- You can also create custom categories
# 5. register_controls() (Optional but Essential)
Purpose: Defines the widget’s settings panel in the Elementor editor.
  protected function register_controls() {
    // Define control sections and controls here
  }
Important Points:
- This method is
protected(notpublic) - Controls are settings users can modify in the Elementor panel
- Controls are organized into sections
- This is where you define all user-configurable options
# 6. render()
Purpose: Outputs the HTML for the frontend display.
  protected function render() {
    $settings = $this->get_settings_for_display();

    // Output your HTML here
    echo '
‘; }
Important Points:
- This method is
protected - Use
$this->get_settings_for_display()to access user settings - Output sanitized HTML
- This code runs on the frontend when the page loads
# Widget Lifecycle
Understanding when methods are called helps you structure your code effectively:
- Widget Registration
- WordPress loads
- Elementor initializes
- Your widget class is registered via
elementor/widgets/registerhook
- Editor Load
- User opens Elementor editor
get_name(),get_title(),get_icon(),get_categories()are called- Widget appears in the panel
- Widget Inserted
- User drags widget onto page
register_controls()is called- Control panel appears in the editor
- Settings Changed
- User modifies controls
- Widget preview updates in editor
render()is called for preview
- Page Saved
- Settings are saved to the database
- Widget configuration is stored
- Frontend Display
- Visitor loads the page
render()is called- HTML is output to the page
# Understanding Controls
Controls are the building blocks of your widget’s settings panel. Let’s break down how they work:
# Control Sections
Controls are organized into sections. A section is a collapsible panel in the editor.
  protected function register_controls() {
    // Start a new section
    $this->start_controls_section(
      'section_content', // Section ID (must be unique within widget)
      [
        'label' => __( 'Content', 'hello-biz-child' ), // Section title
      ]
    );

    // Add controls here

    // End the section
    $this->end_controls_section();
  }
# Adding Controls
Between start_controls_section() and end_controls_section(), you add individual controls:
  $this->add_control(
    'products_per_page', // Control ID (must be unique within widget)
    [
      'label' => __( 'Products Per Page', 'hello-biz-child' ),
      'type' => \Elementor\Controls_Manager::NUMBER,
      'default' => 9,
      'min' => 3,
    ]
  );
# Common Control Types
NUMBER – Numeric input
'type' => \Elementor\Controls_Manager::NUMBER,
'default' => 9,
'min' => 1,
'max' => 100,
'step' => 3,
SELECT – Dropdown menu
'type' => \Elementor\Controls_Manager::SELECT,
'default' => 'date',
'options' => [
    'date' => __( 'Date', 'hello-biz-child' ),
    'title' => __( 'Title', 'hello-biz-child' ),
    'price' => __( 'Price', 'hello-biz-child' ),
],
SELECT2 – Multi-select dropdown
'type' => \Elementor\Controls_Manager::SELECT2,
'multiple' => true,
'options' => $this->get_categories(),
'label_block' => true,
SWITCHER – Toggle switch (yes/no)
'type' => \Elementor\Controls_Manager::SWITCHER,
'label_on' => __( 'Yes', 'hello-biz-child' ),
'label_off' => __( 'No', 'hello-biz-child' ),
'return_value' => 'yes',
'default' => 'yes',
SLIDER – Range slider
'type' => \Elementor\Controls_Manager::SLIDER,
'size_units' => [ 'px' ],
'range' => [
    'px' => [
        'min' => 0,
        'max' => 50,
        'step' => 1,
    ],
],
'default' => [
    'unit' => 'px',
    'size' => 10,
],
TEXT – Text input
'type' => \Elementor\Controls_Manager::TEXT,
'default' => __( 'Default text', 'hello-biz-child' ),
'placeholder' => __( 'Enter text', 'hello-biz-child' ),
# Style Controls
For styling options, use the TAB_STYLE tab:
  $this->start_controls_section(
    'section_style',
    [
      'label' => __( 'Style', 'hello-biz-child' ),
      'tab' => \Elementor\Controls_Manager::TAB_STYLE, // Style tab
    ]
  );
# Using Selectors
Selectors allow controls to directly affect CSS:
$this->add_control(
  'gap',
  [
    'label' => __( 'Gap', 'hello-biz-child' ),
    'type' => \Elementor\Controls_Manager::SLIDER,
    'selectors' => [
      '{{WRAPPER}} .my-grid' => 'gap: {{SIZE}}{{UNIT}};',
    ],
  ]
);
Key Points:
{{WRAPPER}}is replaced with the widget’s unique wrapper selector{{SIZE}}is replaced with the slider value{{UNIT}}is replaced with the selected unit (px, %, em, etc.)
# Accessing Settings in render()
To use the settings in your widget:
  protected function render() {
      // Get settings
      $settings = $this->get_settings_for_display();

      // Access individual settings
      $products_per_page = $settings['products_per_page'];
      $orderby = $settings['orderby'];
      $show_filters = $settings['show_filters'];

      // Use in your code
      if ( $show_filters === 'yes' ) {
          // Display filters
      }
  }
# Widget Registration
To make your widget available in Elementor, you must register it:
function register_my_widget( $widgets_manager ) {
    require_once( __DIR__ . '/my-widget.php' );
    $widgets_manager->register( new \My_Custom_Widget() );
}
add_action( 'elementor/widgets/register', 'register_my_widget' );
Important Points:
- Hook into
elementor/widgets/register - Require/include your widget file
- Instantiate and register your widget class
# Best Practices
# 1. Namespace Your Widget
Avoid naming conflicts by using a unique class name:
// Good
class Collection_Products_Widget extends \Elementor\Widget_Base {

// Better (with namespace)
namespace MyTheme\Widgets;
class Collection_Products extends \Elementor\Widget_Base {
# 2. Translation Ready
Always use translation functions:
// Good
'label' => __( 'Products Per Page', 'hello-biz-child' ),

// Bad
'label' => 'Products Per Page',
# 3. Sanitize Output
Always escape output in render():
// Good
echo '<div class="' . esc_attr( $class ) . '">';
echo esc_html( $title );

// Bad
echo '<div class="' . $class . '">';
echo $title;
# 4. Organize Controls
Group related controls into sections:
// Query settings section
$this->start_controls_section( 'section_query', [...] );

// Display settings section
$this->start_controls_section( 'section_display', [...] );

// Style settings section
$this->start_controls_section( 'section_style', [...] );
# 5. Provide Defaults
Always provide sensible default values:
'default' => 9,  // Good default for products per page
'default' => 'date',  // Reasonable sort option
# Example: Simple Widget Structure
Here’s a complete example of a minimal widget:
<?php
class Simple_Widget extends \Elementor\Widget_Base {

    // Required: Unique widget name
    public function get_name() {
        return 'simple_widget';
    }

    // Required: Widget title in panel
    public function get_title() {
        return __( 'Simple Widget', 'hello-biz-child' );
    }

    // Required: Widget icon
    public function get_icon() {
        return 'eicon-posts-grid';
    }

    // Required: Widget category
    public function get_categories() {
        return [ 'general' ];
    }

    // Optional: Widget keywords for search
    public function get_keywords() {
        return [ 'simple', 'example' ];
    }

    // Define settings controls
    protected function register_controls() {

        // Content Section
        $this->start_controls_section(
            'content_section',
            [
                'label' => __( 'Content', 'hello-biz-child' ),
            ]
        );

        $this->add_control(
            'title',
            [
                'label' => __( 'Title', 'hello-biz-child' ),
                'type' => \Elementor\Controls_Manager::TEXT,
                'default' => __( 'Hello World', 'hello-biz-child' ),
            ]
        );

        $this->end_controls_section();
    }

    // Render widget output
    // Render widget output
    protected function render() {
        $settings = $this->get_settings_for_display();
        ?>
<div class="simple-widget">

<h2><?php echo esc_html( $settings['title'] ); ?></h2>

</div>
<?php }
}
# Understanding the Data Flow
Let’s trace how data flows through a widget:
- User Interaction: User sets “Products Per Page” to 12 in editor
- Setting Saved: Value stored as
['products_per_page' => 12] - Render Called:
render()method executes - Settings Retrieved:
$settings = $this->get_settings_for_display() - Value Accessed:
$settings['products_per_page']returns 12 - Value Used: Used in WP_Query to limit products
# Common Mistakes to Avoid
# Mistake 1: Forgetting Required Methods
// Bad - Missing required methods
class My_Widget extends \Elementor\Widget_Base {
    protected function render() {
        echo 'Hello';
    }
}

// Good - All required methods present
class My_Widget extends \Elementor\Widget_Base {
    public function get_name() { return 'my_widget'; }
    public function get_title() { return 'My Widget'; }
    public function get_icon() { return 'eicon-posts-grid'; }
    public function get_categories() { return ['general']; }
    protected function render() { echo 'Hello'; }
}
# Mistake 2: Not Escaping Output
// Bad - No escaping
echo '<div class="' . $class . '">' . $content . '</div>';

// Good - Properly escaped
echo '<div class="' . esc_attr( $class ) . '">' . esc_html( $content ) . '</div>';
# Mistake 3: Using echo in register_controls()
// Bad - Don't output in register_controls()
protected function register_controls() {
    echo 'Adding controls';  // Wrong!
    $this->add_control(...);
}

// Good - Only define controls
protected function register_controls() {
    $this->add_control(...);
}
# Testing Your Understanding
To verify you understand these concepts, try answering:
- What happens if you don’t implement
get_name()? - Which method outputs HTML to the frontend?
- Where do you define the widget’s settings panel?
- How do you access user settings in the
render()method? - What’s the difference between
protectedandpublicmethods?
Answers:
- PHP will throw a fatal error – it’s a required abstract method
- The
render()method - In the
register_controls()method - Using
$this->get_settings_for_display() publicmethods can be called from outside the class,protectedonly from within the class or child classes
# Summary
You now understand:
- The Elementor widget base class structure
- Required methods and their purposes
- How to define widget controls
- The widget lifecycle
- How settings flow from editor to frontend
- Best practices for widget development
# What’s Next?
In Part 3: Building the Basic Widget Structure, we’ll apply this knowledge to create the foundation of our Collection Products widget. We’ll:
- Create the widget PHP files
- Implement the required methods
- Register the widget with Elementor
- Add basic controls
- Create a simple render method
- Test the widget in Elementor
# Additional Resources
- Elementor Developers – Widget Structure
- Elementor Controls Reference
- PHP Object-Oriented Programming
Previous: ← Part 1: Setting Up the Development Environment
Next: Part 3: Building the Basic Widget Structure →
