In the previous article, Building a WordPress Plugin: Creating the Admin Dashboard Page, a complete admin interface for managing notes was constructed. While functional, every action, such as adding a new note, requires a full page reload. This behavior can feel slow and outdated. Modern web applications provide a more fluid experience by updating content dynamically without interrupting the user’s workflow. This is achieved using AJAX (Asynchronous JavaScript and XML).
This article will refactor the “Add Note” functionality to use AJAX. This will involve creating a JavaScript file to handle the form submission, a PHP function to process the request on the server, and using the WordPress AJAX API to securely connect the two. The result will be a seamless user experience where new notes appear in the list instantly after submission.
Setting Up the AJAX Environment
A proper AJAX implementation in WordPress requires securely loading a JavaScript file and passing necessary data from PHP to it. This is not done by simply adding a <script> tag to the HTML; instead, WordPress provides a structured system of hooks and functions to manage this process correctly.
Enqueuing JavaScript in the Admin
Scripts intended for the admin area should be loaded using the admin_enqueue_scripts action hook. A critical best practice is to load assets only on the pages where they are needed. The admin_enqueue_scripts hook provides a $hook_suffix parameter, which is the unique identifier for the current admin page. By checking this value, the script can be loaded conditionally, preventing unnecessary overhead on other admin screens.
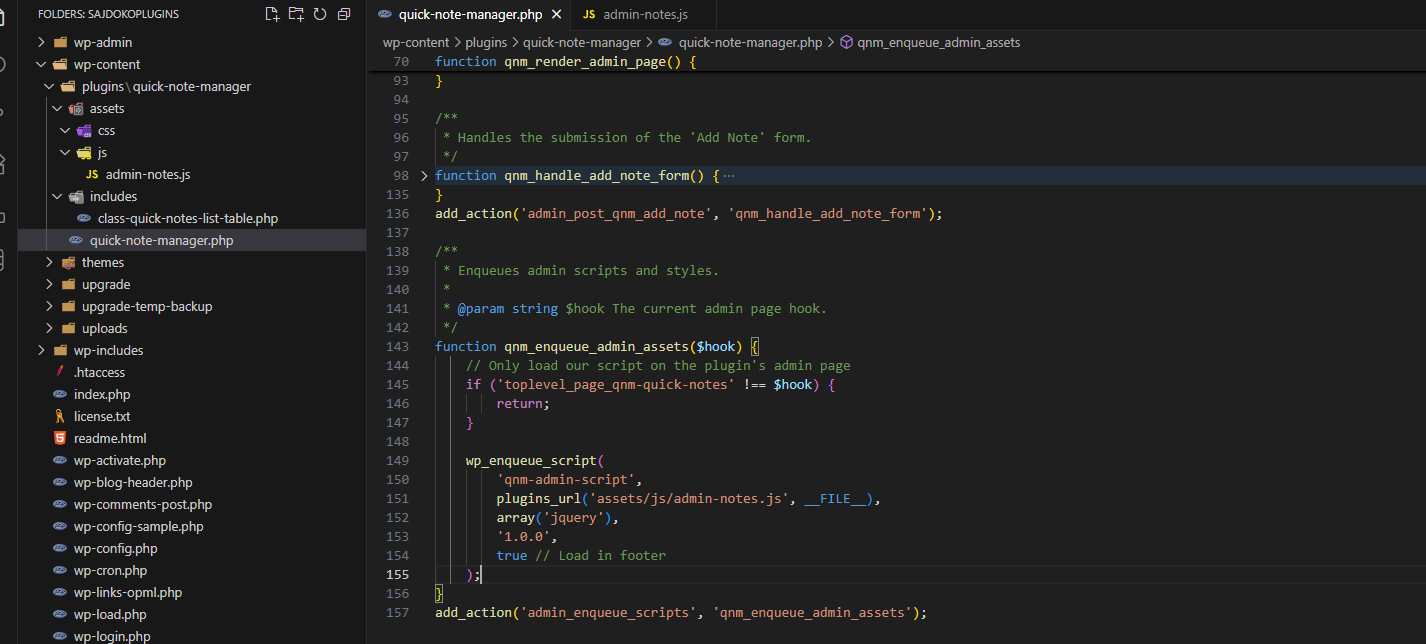
The following function enqueues a new JavaScript file, admin-notes.js, but only on the “Quick Notes” admin page.
/**
 * Enqueues admin scripts and styles.
 *
 * @param string $hook The current admin page hook.
 */
function qnm_enqueue_admin_assets($hook) {
    // Only load our script on the plugin's admin page
    if ('toplevel_page_qnm-quick-notes' !== $hook) {
        return;
    }

    wp_enqueue_script(
        'qnm-admin-script',
        plugins_url('assets/js/admin-notes.js', __FILE__),
        array('jquery'),
        '1.0.0',
        true // Load in footer
    );
}
add_action('admin_enqueue_scripts', 'qnm_enqueue_admin_assets');
Passing Data from PHP to JavaScript with wp_localize_script()
Client-side JavaScript cannot directly access server-side PHP variables or WordPress functions. To bridge this gap, WordPress provides the wp_localize_script() function. It is the standard, secure method for passing data, such as URLs and security tokens, from PHP to an enqueued JavaScript file.
The script needs two key pieces of data
- AJAX URL: The endpoint for all WordPress AJAX requests, which is
admin-ajax.php. - Nonce: A security token to verify the request’s authenticity.
The qnm_enqueue_admin_assets function is updated to include wp_localize_script()
function qnm_enqueue_admin_assets($hook) {
    if ('toplevel_page_qnm-quick-notes' !== $hook) {
        return;
    }

    wp_enqueue_script(
        'qnm-admin-script',
        plugins_url('assets/js/admin-notes.js', __FILE__),
        array('jquery'),
        '1.0.0',
        true
    );

    // Pass data to the script
    wp_localize_script(
        'qnm-admin-script',
        'qnm_ajax_object',
        array(
            'ajax_url' => admin_url('admin-ajax.php'),
            'nonce'    => wp_create_nonce('qnm-ajax-nonce')
        )
    );
}
add_action('admin_enqueue_scripts', 'qnm_enqueue_admin_assets');
This code creates a JavaScript object named qnm_ajax_object that will be available in admin-notes.js. This object contains the ajax_url and a freshly generated nonce.
The Client-Side: Writing the AJAX Request
With the environment set up, the next step is to write the JavaScript that will intercept the form submission and send an AJAX request instead.
Modifying the Form
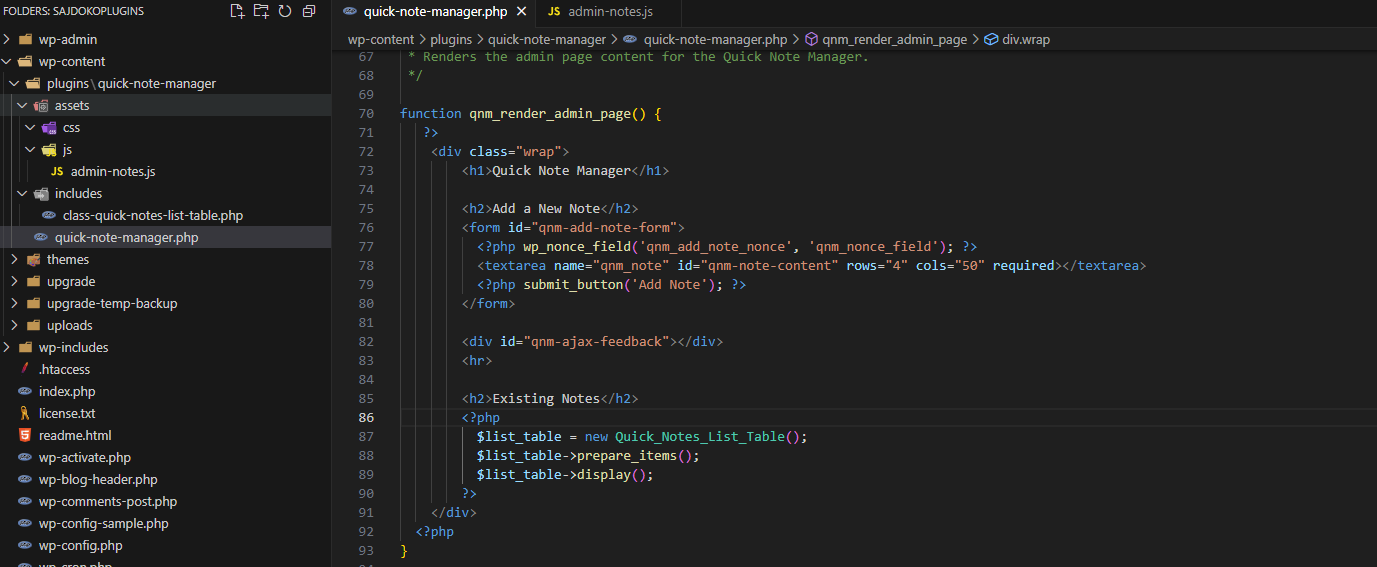
The existing HTML form needs a slight modification. The action and method attributes are no longer necessary, as JavaScript will handle the submission. An id is added to the form for easy targeting.
<form id="qnm-add-note-form">
    <?php wp_nonce_field('qnm_add_note_nonce', 'qnm_nonce_field'); ?>
    <textarea name="qnm_note" id="qnm-note-content" rows="4" cols="50" required></textarea>
    <?php submit_button('Add Note'); ?>
</form>
Note: The original PHP nonce from wp_nonce_field() can be left for non-JavaScript fallback, but the AJAX request will use the nonce passed via wp_localize_script().
The JavaScript (assets/js/admin-notes.js)
This file contains the logic to send the AJAX request using the modern fetch API.
document.addEventListener('DOMContentLoaded', function () {
    const form = document.getElementById('qnm-add-note-form');
    if (!form) {
        return;
    }

    form.addEventListener('submit', function (event) {
        event.preventDefault(); // Stop the default form submission

        const noteContent = document.getElementById('qnm-note-content').value;
        const feedbackDiv = document.getElementById('qnm-ajax-feedback'); // Add a div with this ID to your admin page HTML for feedback

        // Prepare data for the AJAX request
        const formData = new FormData();
        formData.append('action', 'qnm_add_note_ajax');
        formData.append('_ajax_nonce', qnm_ajax_object.nonce);
        formData.append('note', noteContent);

        // Send the request
        fetch(qnm_ajax_object.ajax_url, {
            method: 'POST',
            body: formData
        })
        .then(response => response.json())
        .then(data => {
            if (data.success) {
                // On success, clear the textarea and dynamically add the row to the table
                document.getElementById('qnm-note-content').value = '';
                if (feedbackDiv) {
                    feedbackDiv.textContent = 'Note added successfully!';
                    feedbackDiv.style.color = 'green';
                }
                const notesTable = document.getElementById('qnm-notes-table');
                if (notesTable && data.data.note) {
                    const note = data.data.note;
                    const newRow = notesTable.insertRow(1); // Insert after header

                    // Checkbox cell
                    const cbCell = newRow.insertCell(0);
                    cbCell.innerHTML = `<input type="checkbox" name="note" value="${note.id}" />`;

                    // Note cell
                    const noteCell = newRow.insertCell(1);
                    noteCell.textContent = note.note.length > 100 ? note.note.substring(0, 100) + '...' : note.note;

                    // Created at cell
                    const createdCell = newRow.insertCell(2);
                    createdCell.textContent = note.created_at;

                    // Actions cell
                    const actionsCell = newRow.insertCell(3);
                    actionsCell.innerHTML = `<a href="?page=qnm-quick-notes&action=delete&id=${note.id}" onclick="return confirm('Are you sure?')">Delete</a>`;
                }
            } else {
                // On failure, display an error message
                if (feedbackDiv) {
                    feedbackDiv.textContent = 'Error: ' + data.data.message;
                    feedbackDiv.style.color = 'red';
                }
            }
        })
        .catch(error => {
            console.error('AJAX request failed:', error);
            if (feedbackDiv) {
                feedbackDiv.textContent = 'An unexpected error occurred.';
                feedbackDiv.style.color = 'red';
            }
        });
    });
});
This script listens for the form submission, prevents the default reload, and sends a POST request to the admin-ajax.php URL. It includes the action name, the nonce, and the note content. Upon receiving a response, it reloads the page to display the updated list. A more advanced implementation could parse the returned data and inject a new row into the table dynamically.
The Server-Side: Handling the AJAX Request
The final piece is the PHP function that receives and processes the AJAX request.
The wp_ajax_{action} Hook
WordPress uses a specific hook format for handling AJAX requests from logged-in users: wp_ajax_{action_name}. The
{action_name} corresponds to the action parameter sent in the AJAX request. For this implementation, the hook will be wp_ajax_qnm_add_note_ajax.
The PHP Handler Function
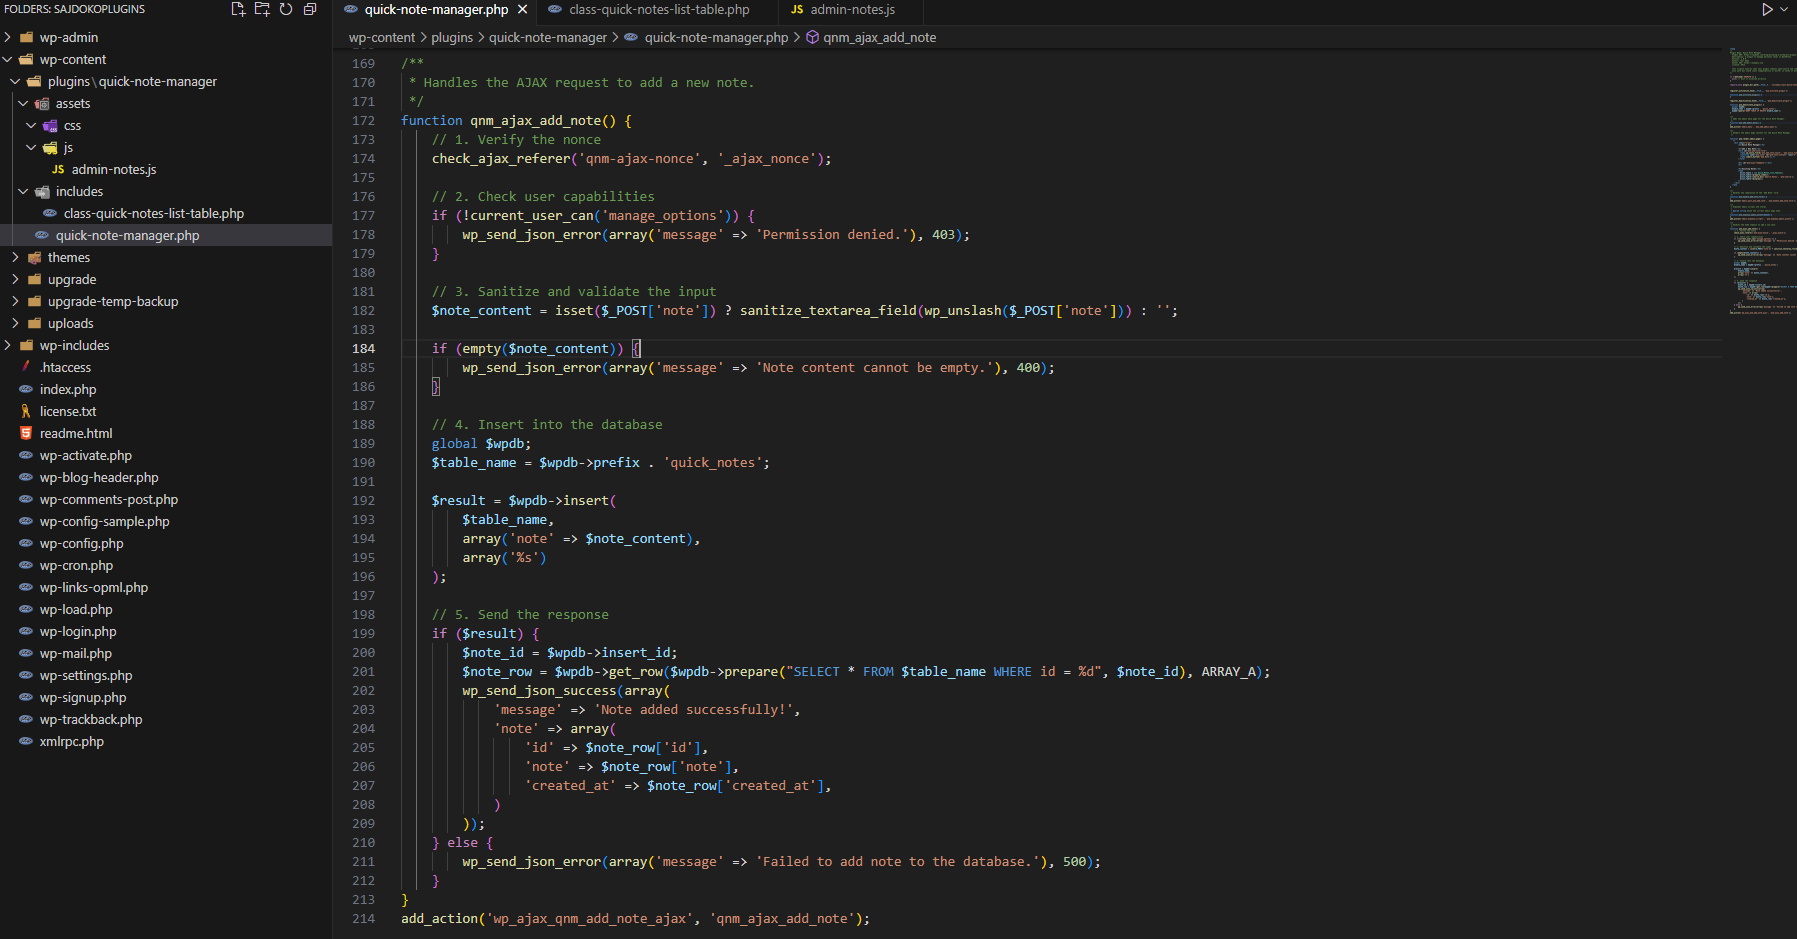
This function will perform security checks, sanitize data, interact with the database, and send a structured JSON response back to the JavaScript.
/**
 * Handles the AJAX request to add a new note.
 */
function qnm_ajax_add_note() {
    // 1. Verify the nonce
    check_ajax_referer('qnm-ajax-nonce', '_ajax_nonce');

    // 2. Check user capabilities
    if (!current_user_can('manage_options')) {
        wp_send_json_error(array('message' => 'Permission denied.'), 403);
    }

    // 3. Sanitize and validate the input
    $note_content = isset($_POST['note']) ? sanitize_textarea_field(wp_unslash($_POST['note'])) : '';

    if (empty($note_content)) {
        wp_send_json_error(array('message' => 'Note content cannot be empty.'), 400);
    }

    // 4. Insert into the database
    global $wpdb;
    $table_name = $wpdb->prefix . 'quick_notes';

    $result = $wpdb->insert(
        $table_name,
        array('note' => $note_content),
        array('%s')
    );

    // 5. Send the response
    if ($result) {
        $note_id = $wpdb->insert_id;
        $note_row = $wpdb->get_row($wpdb->prepare("SELECT * FROM $table_name WHERE id = %d", $note_id), ARRAY_A);
        wp_send_json_success(array(
            'message' => 'Note added successfully!',
            'note' => array(
                'id' => $note_row['id'],
                'note' => $note_row['note'],
                'created_at' => $note_row['created_at'],
            )
        ));
    } else {
        wp_send_json_error(array('message' => 'Failed to add note to the database.'), 500);
    }
}
add_action('wp_ajax_qnm_add_note_ajax', 'qnm_ajax_add_note');
This server-side handler is built for security and clarity
- Nonce Verification: It uses
check_ajax_referer(), the recommended function for AJAX nonce validation, which automatically handles the check and terminates execution on failure. - Capability Check: It ensures the user has the correct permissions.
- Sanitization: It sanitizes the input data before use.
- Database Interaction: It performs the database insertion.
- JSON Response: It uses
wp_send_json_success()orwp_send_json_error()to send a standardized JSON response back to the client. These functions also correctly terminate the script with
wp_die(), which is a requirement for all WordPress AJAX handlers.
This complete AJAX lifecycle—from secure script enqueuing to server-side handling and JSON response—demonstrates the robust, secure, and standardized “WordPress way” of implementing dynamic functionality. It is a system designed to protect against common web vulnerabilities like CSRF by default.
In the next article, Frontend Display with Shortcodes, you’ll learn how to display your Quick Note Manager content publicly on your website. We’ll create intuitive shortcode for effortless integration.
