# Introduction
Now that we have a working widget with controls, it’s time to integrate WooCommerce products. In this part, we’ll query products, display them, work with product data, and create a basic grid layout.
# Learning Objectives
By the end of this tutorial, you will:
- Query WooCommerce products using WP_Query
- Build query arguments based on widget settings
- Access product data using WooCommerce API
- Display product titles, prices, and images
- Work with product taxonomies
- Create a basic product grid layout
- Handle products with no results
# Step 1: Understanding WP_Query for Products
WooCommerce products are a custom post type called product. We use WordPress’s WP_Query to retrieve them.
# Basic Product Query Structure
$args = [
    'post_type' => 'product',
    'posts_per_page' => 9,
    'post_status' => 'publish',
];

$query = new WP_Query( $args );
# Common Query Parameters
- post_type: Must be ‘product’ for WooCommerce products
- posts_per_page: Number of products to retrieve
- orderby: How to sort (date, title, price, etc.)
- order: ASC or DESC
- tax_query: Filter by categories, tags, or attributes
- post_status: Usually ‘publish’ for public products
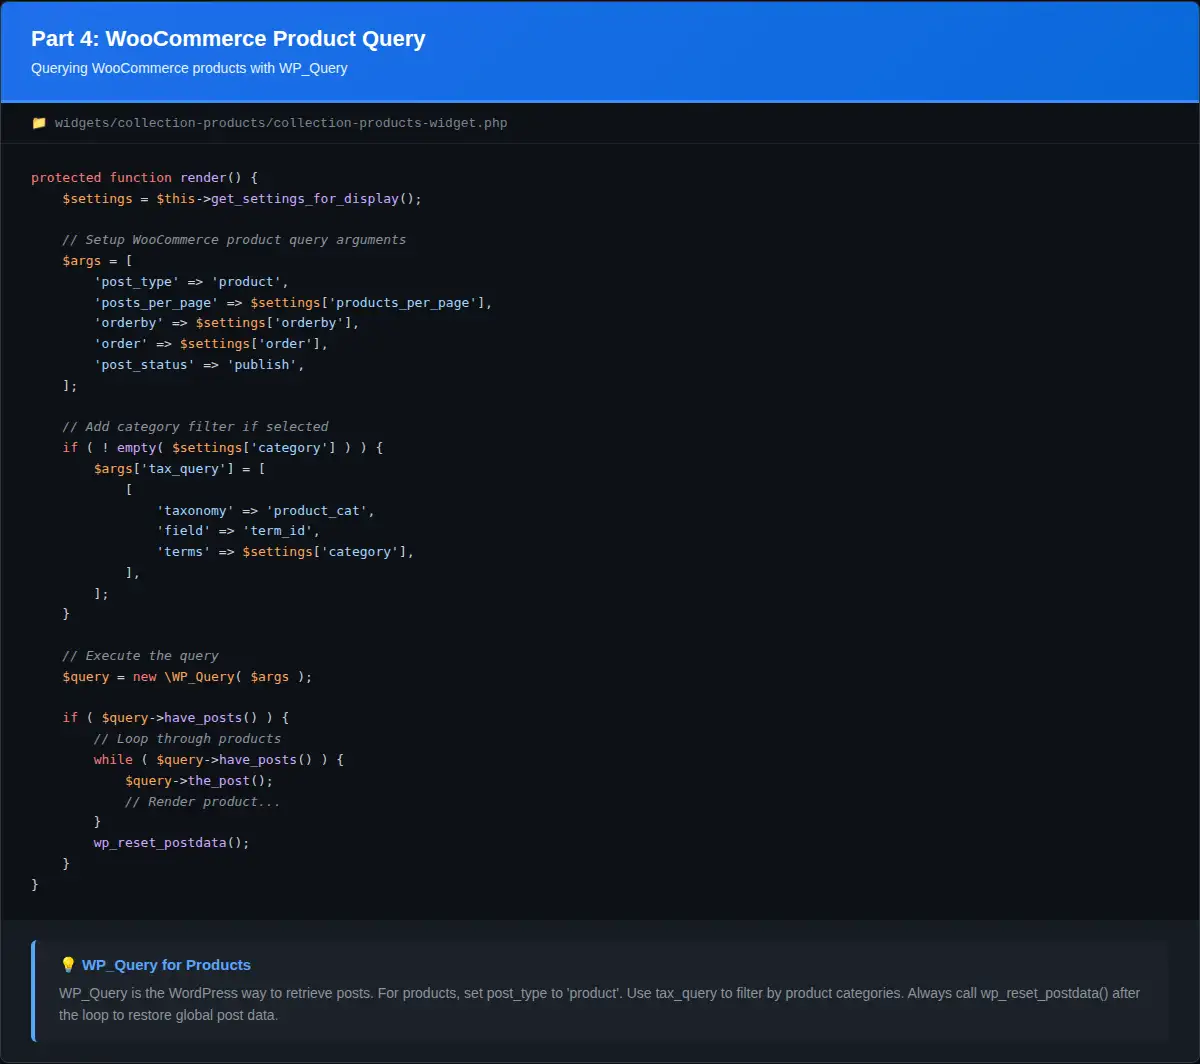
# Step 2: Update the render() Method
Replace the placeholder render() method in collection-products-widget.php with a proper product query:
<?php
protected function render() {
    $settings = $this->get_settings_for_display();

    // Build query arguments
    $args = [
        'post_type' => 'product',
        'posts_per_page' => $settings['products_per_page'],
        'orderby' => $settings['orderby'],
        'order' => $settings['order'],
        'post_status' => 'publish',
    ];

    // Add category filter if specified
    if ( ! empty( $settings['category'] ) ) {
        $args['tax_query'] = [
            [
                'taxonomy' => 'product_cat',
                'field' => 'term_id',
                'terms' => $settings['category'],
            ],
        ];
    }

    // Execute query
    $query = new WP_Query( $args );

    // Check if products found
    if ( $query->have_posts() ) {
        ?>
        <div class="collection-products-wrapper">
            <div class="collection-products-grid">
                <?php
                while ( $query->have_posts() ) {
                    $query->the_post();
                    global $product;

                    // We'll add product display code here
                    ?>
                    <div class="collection-product-item">
                        <h3><?php the_title(); ?></h3>
                    </div>
                    <?php
                }
                ?>
            </div>
        </div>
        <?php
        wp_reset_postdata();
    } else {
        echo '<p>' . __( 'No products found.', 'hello-biz-child' ) . '</p>';
    }
}
Code Explanation:
- Build Arguments: Create array based on widget settings
- Tax Query: Filter by categories if user selected any
- WP_Query: Execute the query
- The Loop: Iterate through results with
have_posts()andthe_post() - global $product: Access WooCommerce product object
- wp_reset_postdata(): Reset query data after loop (important!)
# Step 3: Accessing Product Data
WooCommerce provides rich product data through the $product object. Let’s explore common methods:
# Common Product Methods
global $product;

// Basic info
$product->get_id();                    // Product ID
$product->get_name();                  // Product name
$product->get_title();                 // Product title
$product->get_permalink();             // Product URL

// Pricing
$product->get_price();                 // Current price
$product->get_regular_price();         // Regular price
$product->get_sale_price();            // Sale price
$product->get_price_html();            // Formatted price HTML

// Images
$product->get_image();                 // Featured image HTML
$product->get_image_id();              // Featured image ID
get_the_post_thumbnail_url( $id );     // Image URL

// Product types
$product->is_type( 'simple' );         // Is simple product
$product->is_type( 'variable' );       // Is variable product
$product->is_on_sale();                // Is on sale

// Variations
$product->get_variation_attributes();  // For variable products
# Step 4: Display Product Information
Update the product loop to display complete product information:
<?php
while ( $query->have_posts() ) {
    $query->the_post();
    global $product;

    $product_id = get_the_ID();
    ?>
    <div class="collection-product-item">
        <a href="<?php echo esc_url( get_permalink() ); ?>" class="collection-product-link">
            <div class="collection-product-image">
                <?php
                $image_url = get_the_post_thumbnail_url( $product_id, 'full' );
                if ( $image_url ) :
                ?>
                    <img src="<?php echo esc_url( $image_url ); ?>"
                         alt="<?php echo esc_attr( get_the_title() ); ?>">
                <?php endif; ?>
            </div>
        </a>

        <div class="collection-product-info">
            <div class="collection-product-info-left">
                <h3 class="collection-product-title">
                    <a href="<?php echo esc_url( get_permalink() ); ?>">
                        <?php the_title(); ?>
                    </a>
                </h3>
            </div>

            <div class="collection-product-price">
                <?php echo $product->get_price_html(); ?>
            </div>
        </div>
    </div>
    <?php
}
Code Explanation:
- Product Link: Wraps image in link to product page
- Product Image: Displays featured image
- esc_url(): Sanitizes URLs
- esc_attr(): Sanitizes attributes
- get_price_html(): Displays formatted price with currency
# Step 5: Add Basic Grid CSS
Create wp-content/themes/hello-biz-child/css/collection.css:
/* Collection Products Grid */
.collection-products-wrapper {
    width: 100%;
    max-width: 100%;
}

.collection-products-grid {
    display: grid;
    grid-template-columns: repeat(2, 1fr);
    gap: 10px;
    width: 100%;
}

.collection-product-item {
    position: relative;
}

.collection-product-link {
    display: block;
    text-decoration: none;
    color: inherit;
}

.collection-product-image {
    position: relative;
    width: 100%;
    padding-bottom: 100%; /* Square aspect ratio */
    overflow: hidden;
    background: #f5f5f5;
}

.collection-product-image img {
    position: absolute;
    top: 0;
    left: 0;
    width: 100%;
    height: 100%;
    object-fit: cover;
}

.collection-product-info {
    padding: 15px 0;
    display: flex;
    justify-content: space-between;
    align-items: flex-start;
    gap: 15px;
}

.collection-product-info-left {
    flex: 1;
}

.collection-product-title {
    margin: 0;
    font-size: 14px;
    font-weight: 400;
    line-height: 1.4;
}

.collection-product-title a {
    color: #333;
    text-decoration: none;
}

.collection-product-title a:hover {
    color: #000;
}

.collection-product-price {
    font-size: 14px;
    color: #333;
    white-space: nowrap;
}

/* Responsive */
@media (max-width: 768px) {
    .collection-products-grid {
        grid-template-columns: 1fr;
    }
}
# Step 6: Enqueue the CSS File
Add this function to collection-products-register.php:
/**
 * Load widget styles.
 *
 * @return void
 */
function collection_products_widget_styles() {
    wp_enqueue_style(
        'collection-products-widget-style',
        get_stylesheet_directory_uri() . '/css/collection.css',
        [],
        HELLO_BIZ_CHILD_VERSION
    );
}
add_action( 'wp_enqueue_scripts', 'collection_products_widget_styles', 20 );
# Step 7: Test Product Display
- Edit your test page in Elementor
- The widget should now display products in a grid
- Try different settings:
- Change products per page
- Change order by
- Select specific categories
- View the page on the frontend to see the live result
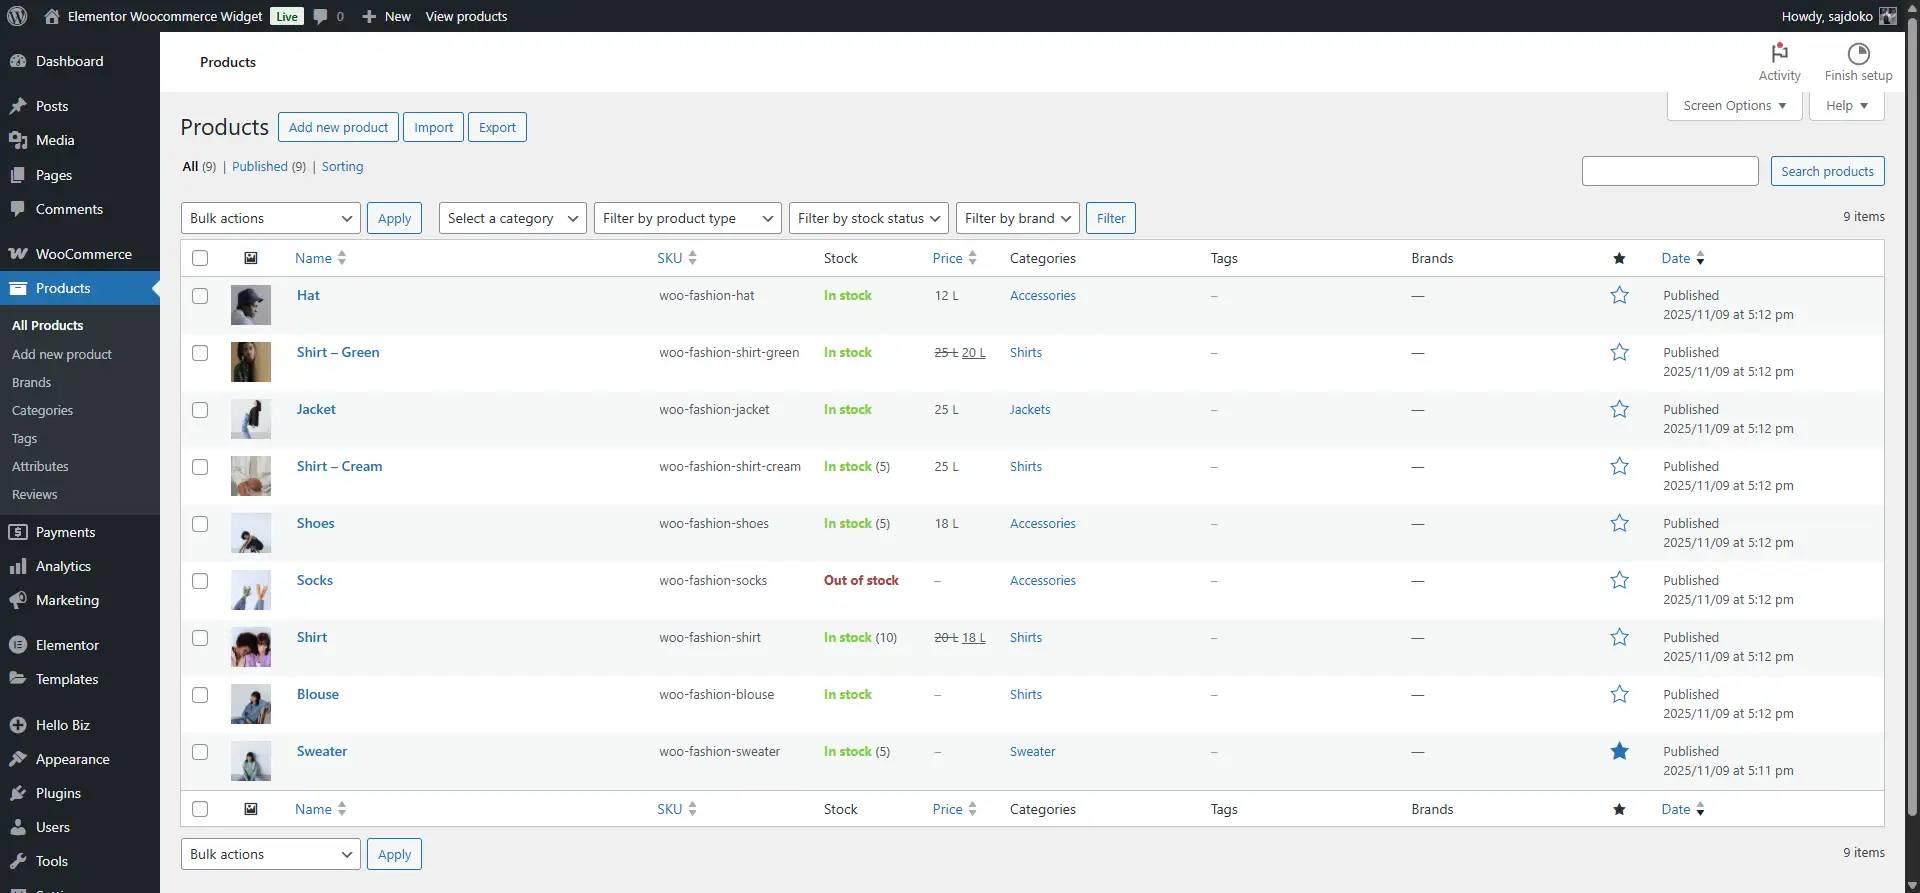
WooCommerce products displayed in the admin
# Step 8: Handle Special Cases
# Handle Products Without Images
Update the image display code:
<div class="collection-product-image">
    <?php
    $image_url = get_the_post_thumbnail_url( $product_id, 'full' );
    if ( $image_url ) :
    ?>
        <img src="<?php echo esc_url( $image_url ); ?>"
             alt="<?php echo esc_attr( get_the_title() ); ?>">
    <?php else : ?>
        <div class="no-image-placeholder">
            <span><?php _e( 'No Image', 'hello-biz-child' ); ?></span>
        </div>
    <?php endif; ?>
</div>
Add to CSS:
.no-image-placeholder {
    position: absolute;
    top: 0;
    left: 0;
    width: 100%;
    height: 100%;
    display: flex;
    align-items: center;
    justify-content: center;
    background: #f0f0f0;
    color: #999;
}
# Handle Variable Products
Check if product is variable and show starting price:
<div class="collection-product-price">
    <?php
    if ( $product->is_type( 'variable' ) ) {
        echo __( 'From ', 'hello-biz-child' );
    }
    echo $product->get_price_html();
    ?>
</div>
# Complete render() Method
Here’s the complete render() method with all improvements:
<?php
protected function render() {
    $settings = $this->get_settings_for_display();

    $args = [
        'post_type' => 'product',
        'posts_per_page' => $settings['products_per_page'],
        'orderby' => $settings['orderby'],
        'order' => $settings['order'],
        'post_status' => 'publish',
    ];

    // Add category filter
    if ( ! empty( $settings['category'] ) ) {
        $args['tax_query'] = [
            [
                'taxonomy' => 'product_cat',
                'field' => 'term_id',
                'terms' => $settings['category'],
            ],
        ];
    }

    $query = new WP_Query( $args );

    if ( $query->have_posts() ) {
        ?>
        <div class="collection-products-wrapper">
            <div class="collection-products-grid">
                <?php
                while ( $query->have_posts() ) {
                    $query->the_post();
                    global $product;

                    $product_id = get_the_ID();
                    ?>
                    <div class="collection-product-item">
                        <a href="<?php echo esc_url( get_permalink() ); ?>" class="collection-product-link">
                            <div class="collection-product-image">
                                <?php
                                $image_url = get_the_post_thumbnail_url( $product_id, 'full' );
                                if ( $image_url ) :
                                ?>
                                    <img src="<?php echo esc_url( $image_url ); ?>"
                                         alt="<?php echo esc_attr( get_the_title() ); ?>">
                                <?php else : ?>
                                    <div class="no-image-placeholder">
                                        <span><?php _e( 'No Image', 'hello-biz-child' ); ?></span>
                                    </div>
                                <?php endif; ?>
                            </div>
                        </a>

                        <div class="collection-product-info">
                            <div class="collection-product-info-left">
                                <h3 class="collection-product-title">
                                    <a href="<?php echo esc_url( get_permalink() ); ?>">
                                        <?php the_title(); ?>
                                    </a>
                                </h3>
                            </div>

                            <div class="collection-product-price">
                                <?php echo $product->get_price_html(); ?>
                            </div>
                        </div>
                    </div>
                    <?php
                }
                ?>
            </div>
        </div>
        <?php
        wp_reset_postdata();
    } else {
        echo '<p>' . __( 'No products found.', 'hello-biz-child' ) . '</p>';
    }
}
# Common Issues and Solutions
# Issue 1: Products Not Showing
Solutions:
- Verify you have published products in WooCommerce
- Check that product visibility is set to “Catalog and search”
- Ensure products are in the selected categories
- Check
post_statusis ‘publish’
# Issue 2: Wrong Products Showing
Solutions:
- Verify
orderbyandordersettings - Check category filter is working correctly
- Ensure no other plugins are filtering the query
# Issue 3: Images Not Displaying
Solutions:
- Verify products have featured images set
- Check image URLs in browser console
- Ensure file permissions are correct
- Try regenerating thumbnails
# Issue 4: Prices Not Showing Correctly
Solutions:
- Ensure WooCommerce currency settings are configured
- Verify products have prices set
- Check for theme conflicts with price display
# Summary
You’ve successfully integrated WooCommerce products into your widget:
- Query products with WP_Query
- Access product data via WooCommerce API
- Display product images, titles, and prices
- Handle products without images
- Create responsive grid layout
- Added basic styling
# What’s Next?
In Part 5: Implementing Custom Product Meta Fields, we’ll:
- Add custom collection image field to products
- Integrate WordPress media library uploader
- Add product orientation field
- Save and retrieve custom meta data
- Update frontend to display custom images
Previous: ← Part 3: Building the Basic Widget Structure
Next: Part 5: Implementing Custom Product Meta Fields →
