# Introduction
Welcome to this comprehensive tutorial series on building a custom Elementor widget for WooCommerce! In this series, you’ll learn how to create a “Collection Products” widget from scratch that displays WooCommerce products in a beautiful Pinterest-style grid layout with custom collection images, filtering, and sorting capabilities.
# What You’ll Build
By the end of this tutorial series, you’ll have created a fully functional Elementor widget that:
-
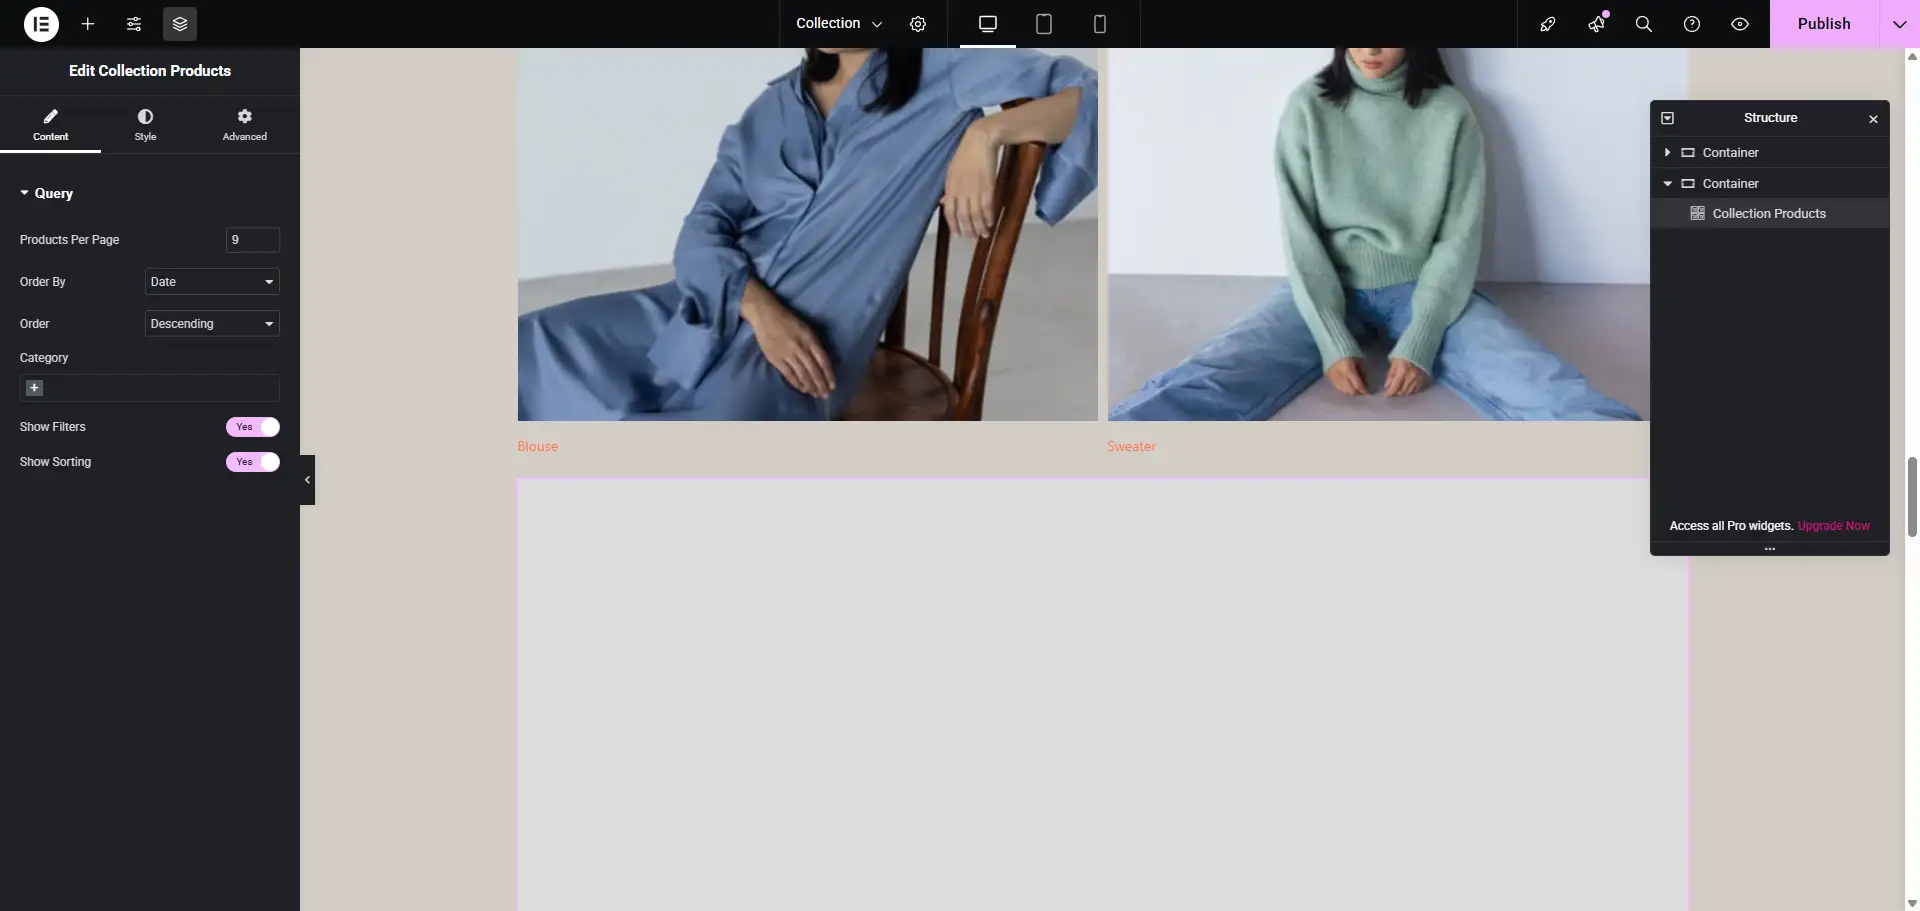
- Displays WooCommerce products in a responsive 2-column grid layout
- Supports custom “collection” images separate from product featured images
- Shows featured images on hover (for portrait products)
- Includes client-side filtering by colors and sizes
- Provides sorting options (price low to high, high to low)
- Features a slide-in filter panel
- Displays product color swatches
- Works seamlessly across desktop, tablet, and mobile devices
The Elementor WooCommerce Collection Widget
# Prerequisites
Before starting this tutorial series, you should have:
- Basic understanding of PHP (WordPress/WooCommerce development)
- Familiarity with JavaScript and jQuery
- Understanding of HTML and CSS
- Basic knowledge of WordPress hooks and filters
- WordPress installation with admin access
- WooCommerce plugin installed and activated
- Elementor plugin installed and activated
- Hello Biz theme with Hello Biz Child theme set up
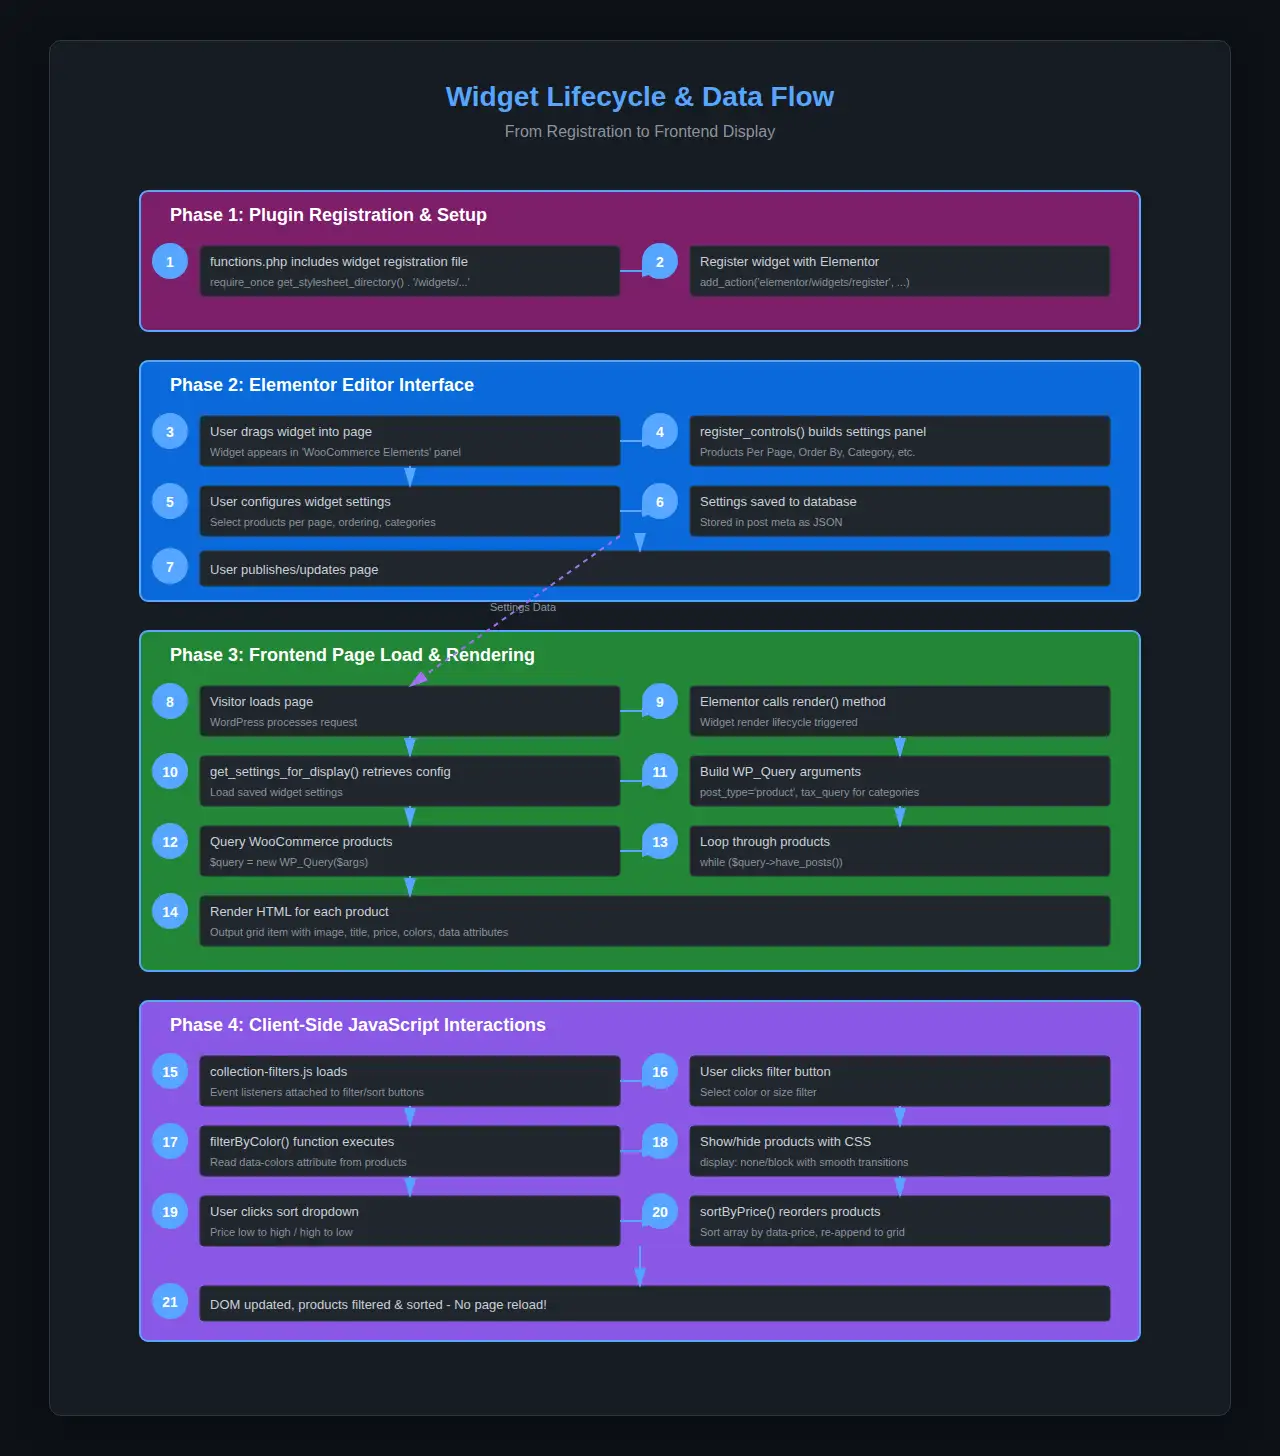
# Tutorial Series Structure
Part 1: Setting Up the Development Environment
Learn how to set up your WordPress development environment, install necessary plugins, and create the child theme structure for the widget.
Part 2: Understanding Elementor Widget Architecture
Dive into the fundamentals of Elementor widget development, understanding the base class, required methods, and the widget lifecycle.
Part 3: Building the Basic Widget Structure
Create the foundation of your widget by implementing the widget class, registering it with Elementor, and adding basic controls.
Part 4: WooCommerce Product Integration
Learn how to query WooCommerce products, access product data, work with product taxonomies, and display product information.
Part 5: Implementing Custom Product Meta Fields
Add custom meta fields to WooCommerce products including a collection image uploader using the WordPress media library and product orientation settings.
Part 6: Creating the Frontend Rendering
Build the grid layout using CSS Grid, implement the product rendering logic, add color swatches, and create responsive designs.
Part 7: Adding Sorting and Filtering Functionality
Implement client-side JavaScript filtering and sorting, create the filter panel UI, and add touch-friendly interactions.
# Key Concepts Covered
Throughout this series, you’ll learn:
- Elementor Widget Development
- Extending
\Elementor\Widget_Base - Implementing required methods
- Adding widget controls
- Rendering frontend output
- Extending
- WooCommerce Integration
- Querying products with
WP_Query - Working with product data
- Handling product variations
- Displaying product meta
- Querying products with
- WordPress Development Best Practices
- Using WordPress hooks and filters
- Sanitizing and escaping data
- Enqueuing scripts and styles
- Following WordPress coding standards
- Modern Frontend Development
- CSS Grid layouts
- Responsive design with media queries
- JavaScript DOM manipulation
- Client-side filtering without AJAX
- WordPress Media Library
- Integrating
wp.media()API - Creating custom media uploaders
- Handling image selection
- Integrating
# File Structure
By the end of this series, your child theme will have the following structure:
wp-content/themes/hello-biz-child/
├── functions.php                                    # Main theme functions
├── style.css                                        # Child theme styles
├── widgets/
│   └── collection-products/
│       ├── collection-products-register.php         # Widget registration & helpers
│       └── collection-products-widget.php           # Main widget class
├── js/
│   ├── collection-image-uploader.js                # Admin media uploader
│   └── collection-filters.js                       # Frontend filtering & sorting
└── css/
    └── collection.css                              # Widget styles
# Tutorial Format
Each tutorial part includes:
- Clear objectives – What you’ll accomplish in that part
- Step-by-step instructions – Detailed implementation steps
- Code snippets with comments – Well-documented code examples
- Explanations – Understanding of what the code does and why
- Common issues and solutions – Troubleshooting tips
- Testing instructions – How to verify your implementation
- Summary – Key takeaways and what’s next
# Additional Resources
- Elementor Developers Documentation
- WooCommerce Developer Documentation
- WordPress Developer Resources
- WordPress Coding Standards
# Getting Started
Ready to begin? Start with Part 1: Setting Up the Development Environment!
# Support and Feedback
If you encounter any issues or have questions while following this tutorial series, please:
- Review the troubleshooting sections in each part
- Check the code examples in the repository
- Consult the WordPress and Elementor documentation
- Search for similar issues in WordPress/Elementor forums
Happy coding! Let’s build an amazing WooCommerce widget together!
