WordPress development can feel overwhelming when you’re just starting out, but using the right tools can simplify your workflow and help you build better sites faster. In this article, we’ll cover five essential development tools that every WordPress beginner should know. Whether you’re developing themes, plugins, or just want to improve your development process, these tools will make your life easier.
1. Local Development Environment: Local by Flywheel
When you’re working on a WordPress site, especially in the early stages of development, it’s important to have a local environment that mirrors a live server. This way, you can test features, install plugins, and make coding changes without the risk of breaking the live website. Local by Flywheel is one of the most popular tools for setting up local WordPress environments, particularly because of its simplicity and powerful features.
Why Choose Local by Flywheel?
Local by Flywheel is a free, beginner-friendly local development tool. It offers a straightforward interface, making it easy to set up WordPress sites on your computer without needing to manually configure complex server environments (like setting up Apache or Nginx, PHP, MySQL, etc.). With just a few clicks, you can create a new WordPress installation locally and begin building your website or developing a theme or plugin.
Key Features of Local by Flywheel:
- One-Click WordPress Installations: No need to manually download WordPress, configure a database, or deal with file permissions. Local handles all of this for you, so you can focus on coding and development.
- Customizable Environments: Local allows you to tailor the server settings for your projects. You can select different versions of PHP (such as PHP 7.4, 8.0, or 8.1), MySQL, or web servers like Apache or Nginx. This is incredibly useful when you want to test your site against different configurations.
- SSL Support: You can set up SSL certificates with one click, ensuring your local environment mimics a secure production environment. This is critical when working with features like WooCommerce or any project that handles sensitive data.
- Database Management: With built-in database management through Adminer or phpMyAdmin, Local makes it easy to interact with the database. Whether you need to import/export databases, run SQL queries, or view your data, these tools are readily available within the app.
- Live Links: Local’s Live Link feature allows you to share your local development environment with clients or collaborators by creating a temporary, publicly accessible URL. This is perfect for getting feedback without needing to deploy your site on a public server.
- Blueprints: If you’re building multiple WordPress sites with similar configurations, Local’s Blueprints feature allows you to save your favorite settings, themes, and plugins as a template. You can use this template to quickly create new WordPress sites without repeating the setup process.
Step-by-Step Guide to Setting Up a WordPress Site in Local by Flywheel:
- Download and Install Local: Head over to the Local by Flywheel website and download the application for your operating system (available for Windows, macOS, and Linux).
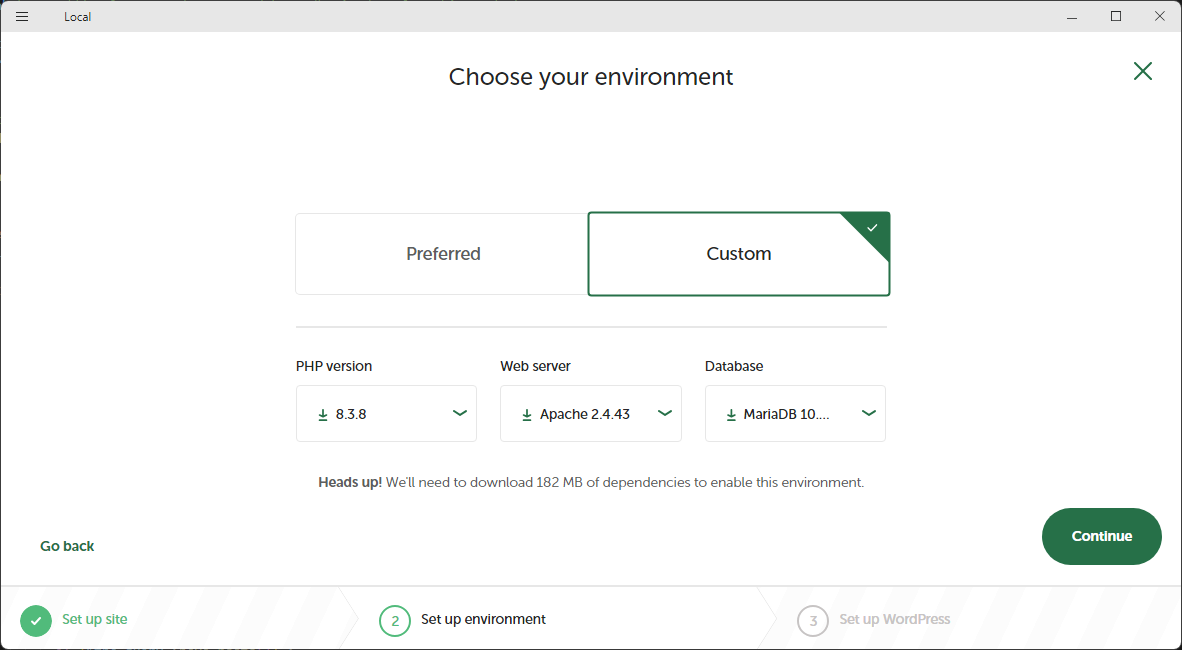
- Create a New WordPress Site:
- Open Local and click on “Create a New Site”.
- Choose a name for your site (e.g., “My First WordPress Site”).
- Select the preferred environment (you can choose between Preferred or Custom setups, depending on whether you want to modify the PHP or MySQL versions).
- Enter your WordPress username and password (this will be your login for the WordPress dashboard).
- Start Developing:
- Once the site is created, click on “Start Site” to launch your local WordPress instance.
- Local provides a direct link to the WordPress dashboard (e.g., http://myfirstwordpresssite.local/wp-admin) so you can start developing your site immediately.
- Access the Database: To manage your database, click on the “Database” tab in Local. From there, you can launch Adminer or phpMyAdmin to view and modify your tables.
- Enable Live Link (Optional): If you need to share your local site with others, click on the “Enable Live Link” button. This will generate a temporary link that anyone can use to access your development site.
When Should You Use Local by Flywheel?
Local is ideal when:
- You’re developing a WordPress site and want to test changes without affecting the live site.
- You need to quickly prototype and experiment with WordPress themes, plugins, or configurations.
- You’re working on a project that involves extensive testing (like adding a new feature or fixing bugs).
- You want to share your local development work with a client or team for review, without needing to deploy it on a live server.
Pro Tip
If you’re transitioning to a live server, Local integrates seamlessly with Flywheel or WP Engine hosting (although you can still manually migrate to any host). This makes it an excellent option if you’re planning on hosting your WordPress site with those platforms.
2. Code Editor: Visual Studio Code (VS Code)
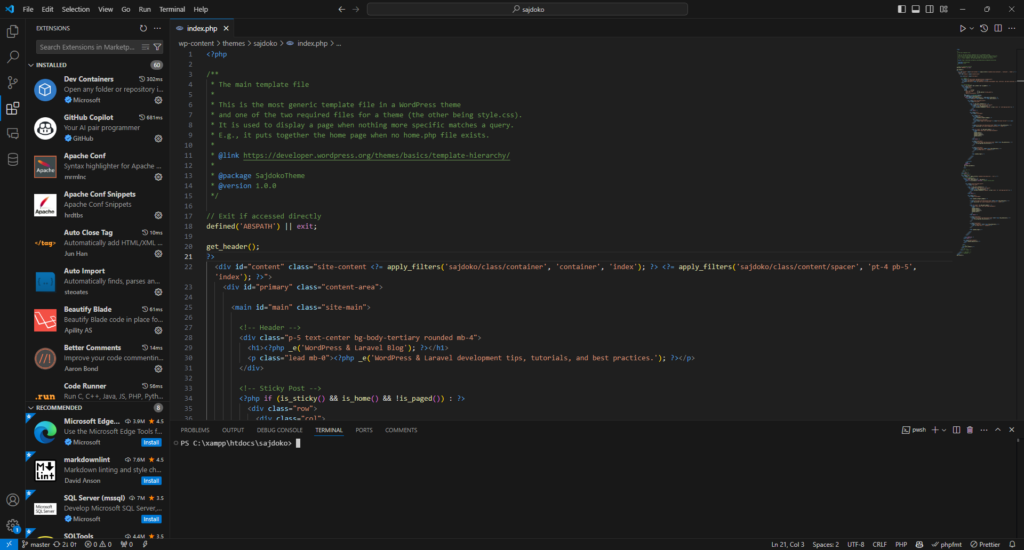
A reliable code editor is a must-have for every developer, and Visual Studio Code (VS Code) is one of the best options available. It’s free, open-source, and packed with features that make it ideal for WordPress development. Whether you’re editing PHP, HTML, CSS, or JavaScript, VS Code provides all the tools you need in a lightweight and highly customizable environment.
Why Visual Studio Code?
VS Code has become a popular choice among developers for a reason. Its flexibility and ease of use make it a great option for beginners, while its robust ecosystem of extensions ensures that more advanced users can get everything they need from the platform. It supports many programming languages out of the box, including PHP (which is essential for WordPress development), and can be extended with thousands of plugins to match your workflow.
Key Features of VS Code for WordPress Development:
- Syntax Highlighting: VS Code provides syntax highlighting for a wide range of languages, including PHP, HTML, CSS, and JavaScript. This makes it easier to read and write code since different parts of your code are color-coded.
- IntelliSense: This feature offers smart completions based on variable types, function definitions, and imported modules. For example, as you type in PHP, IntelliSense will provide function suggestions and help you autocomplete them.
- Integrated Terminal: You can open a terminal directly in VS Code, allowing you to run commands such as npm installs, WP-CLI commands, or Git commands without switching to another application.
- Git Integration: VS Code comes with built-in Git support. You can initialize repositories, commit changes, push code, and view diffs directly in the editor. This feature is perfect for tracking changes in your WordPress themes or plugins.
- Extensions for WordPress: There are a number of helpful extensions for WordPress developers in VS Code. These include PHP Intelephense for better PHP language support, WordPress Snippet for code snippets, and WordPress Hooks IntelliSense for autocompletion of WordPress hooks and filters.
How to Set Up Visual Studio Code for WordPress Development
- Download and Install VS Code: Visit the official Visual Studio Code website to download and install the editor on your operating system.
- Install PHP and JavaScript Extensions:
- Open VS Code, click on the Extensions icon on the sidebar (or press
Ctrl + Shift + X). - Search for PHP Intelephense and install it for advanced PHP support like autocompletion and linting.
- For JavaScript and CSS development, consider adding ESLint and Prettier for formatting and linting your code.
- Open VS Code, click on the Extensions icon on the sidebar (or press
- Set Up a Workspace for Your WordPress Project:
- Click on File > Open Folder, then navigate to your WordPress theme or plugin folder.
- This will allow you to work within the context of your project, giving you access to all files and enabling project-specific features like search and Git integration.
- Customize Your Editor with Themes and Shortcuts:
- To make the coding environment more comfortable, you can install themes and set custom keyboard shortcuts under File > Preferences > Color Theme or Keyboard Shortcuts.
Useful Extensions for WordPress Development in VS Code
- PHP Intelephense: This is a must-have extension for working with PHP. It enhances the PHP language support with features like autocomplete, function signature help, and error checking.
- WordPress Snippet: This extension provides ready-to-use code snippets for common WordPress functions, actions, and filters, which can speed up your workflow significantly.
- Prettier: A code formatter that ensures your HTML, CSS, JavaScript, and PHP files remain clean and consistently formatted.
- WordPress Hooks IntelliSense: Offers autocompletion for WordPress hooks and filters, helping you quickly implement the appropriate hook without having to look up its syntax.
When to Use Visual Studio Code?
VS Code is perfect for WordPress development because:
- It supports the full range of languages you’ll use, including PHP, HTML, CSS, and JavaScript.
- It has powerful version control tools that integrate seamlessly with Git, helping you track changes in your themes and plugins.
- You can extend it with WordPress-specific extensions to speed up your development process and avoid common errors.
Pro Tip
VS Code can be configured to work with Live Server, a popular extension that automatically refreshes your browser whenever you save changes to your code. This is useful for front-end development when you want to see updates in real-time.
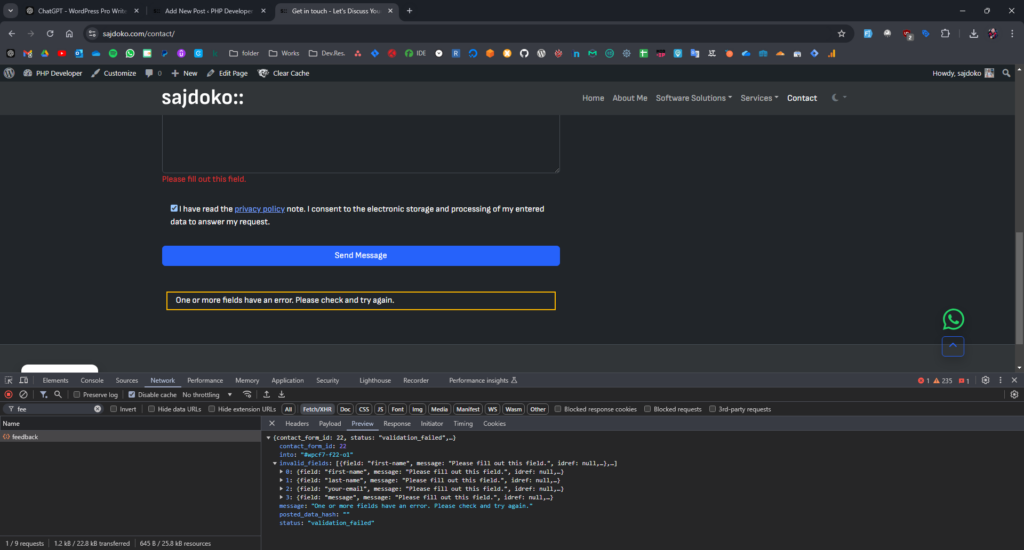
3. Browser Developer Tools: Chrome DevTools
Every web developer should be familiar with browser developer tools, as they provide invaluable insights into how your website is functioning. Among the available options, Chrome DevTools stands out for its ease of use, comprehensive features, and widespread adoption. It’s built directly into the Google Chrome browser, so you can access it without installing any additional software.
Why Use Chrome DevTools?
Chrome DevTools allows you to inspect and edit the HTML, CSS, and JavaScript of your website in real time. You can troubleshoot layout issues, find performance bottlenecks, debug JavaScript, and test how your WordPress site looks on different screen sizes—all without leaving your browser.
Key Features of Chrome DevTools for WordPress Development:
- Element Inspector: This tool lets you inspect and edit the DOM (Document Object Model) of your WordPress site. You can see exactly which HTML elements and CSS rules are applied to each part of your site, allowing you to tweak styles or identify layout problems.
- CSS Editing: With the Styles panel, you can directly modify the CSS of your website. Changes are reflected instantly on the page, helping you test different styling options without needing to reload or edit the original files.
- JavaScript Debugging: The Sources tab allows you to debug JavaScript errors by setting breakpoints, stepping through your code line by line, and watching variables change in real time. This is invaluable for troubleshooting interactive elements on your WordPress site.
- Mobile Device Emulation: Chrome DevTools includes a device toolbar that allows you to see how your site will look on different screen sizes and devices. You can simulate touch events and even test performance on slower network speeds.
- Performance Analysis: The Performance tab helps you identify slow-loading scripts or rendering issues that may affect your WordPress site’s speed. You can record a profile of your page’s activity and see which processes take the longest.
How to Access Chrome DevTools
- Open Chrome: Launch the Chrome browser and navigate to your WordPress site.
- Access DevTools:
- Right-click on any part of your website and select Inspect, or press
Ctrl + Shift + I(Windows/Linux) orCmd + Option + I(macOS). - The Chrome DevTools panel will open, allowing you to start inspecting and debugging your site.
- Right-click on any part of your website and select Inspect, or press
Using Chrome DevTools for WordPress Debugging
- Inspecting Elements: Navigate to the Elements tab to inspect the HTML structure of your WordPress site. You can hover over any HTML tag to highlight the corresponding element on the page. This helps you quickly find and modify the elements you want to style or debug.
- CSS Troubleshooting: The Styles pane within the Elements tab shows all the CSS rules applied to the selected element. You can edit CSS properties directly here, and the changes will be instantly reflected on the page. This is useful for experimenting with layouts or fixing CSS bugs.
- JavaScript Debugging: Switch to the Sources tab to debug JavaScript issues. You can set breakpoints on specific lines of code and step through your script to see how it executes. This is especially helpful when debugging complex WordPress themes or plugins that use JavaScript.
- Mobile Emulation: Click on the Toggle Device Toolbar icon in the top-left corner of DevTools to switch to mobile device emulation. You can test how your WordPress site looks and functions on different screen sizes, from mobile phones to tablets. This tool also allows you to simulate touch events to test mobile navigation.
- Testing Performance: Go to the Performance tab, hit the record button, and then interact with your website. This will create a performance profile showing how resources are loaded and rendered. You can use this data to optimize your WordPress site for better speed and performance.
When Should You Use Chrome DevTools?
Chrome DevTools is essential when:
- You need to troubleshoot front-end issues such as broken layouts, incorrect styling, or unresponsive elements.
- You’re debugging JavaScript that powers interactive features on your WordPress site.
- You want to optimize your WordPress site’s performance and ensure it loads quickly on all devices.
- You’re testing your site’s mobile responsiveness and ensuring it works smoothly on smartphones and tablets.
Pro Tip
Chrome DevTools is not limited to Chrome. Most modern browsers, including Firefox and Edge, offer similar developer tools. However, Chrome DevTools tends to be the most feature-rich and widely supported, making it a favorite among WordPress developers.
4. Version Control: Git & GitHub
As a WordPress developer, tracking changes to your code is crucial, whether you’re working on a theme, plugin, or core modifications. Git is a powerful version control system that allows you to manage changes to your codebase over time, and GitHub is a cloud-based platform for hosting and sharing Git repositories. Together, these tools help you collaborate with others, keep your work organized, and ensure that you never lose track of your progress.

Why Git & GitHub?
Git helps you maintain a history of your code, which is incredibly valuable when you’re making incremental changes or experimenting with new features. If something goes wrong, Git allows you to revert back to a previous state. With GitHub, you can also collaborate with others, making it easy to manage contributions to a project.
Key Features of Git & GitHub for WordPress Development:
- Version Control: Git tracks every change you make to your code, allowing you to commit those changes along with a descriptive message. This makes it easy to understand what was changed, why, and when.
- Branching: Git allows you to create branches for working on new features or bug fixes. Each branch is isolated from the main codebase, so you can experiment freely without affecting the stable version of your WordPress theme or plugin.
- Collaboration: GitHub facilitates collaboration by allowing multiple people to work on the same project. Developers can clone the project, make changes, and submit pull requests to merge their work into the main codebase.
- Backup & Rollback: Git ensures that you always have a complete history of your project. If something breaks, you can easily roll back to a previous version. This is invaluable when making big changes to a WordPress site.
- Open Source Community: GitHub is home to millions of open-source projects. If you’re building WordPress themes or plugins, sharing your work on GitHub allows others to contribute and help improve your code.
Setting Up Git & GitHub for WordPress Development
- Install Git:
- If you don’t already have Git installed, head to the official Git website and download the version for your operating system (Windows, macOS, or Linux).
- After installation, open a terminal (or Git Bash on Windows) and type
git --versionto verify the installation.
- Create a GitHub Account: If you don’t already have a GitHub account, you can sign up for free at GitHub.com. Once you have an account, create a new repository where you’ll store your WordPress project.
- Initialize a Git Repository in Your WordPress Project:
- Navigate to your WordPress project folder in the terminal.
- Run the command
git initto initialize a Git repository. - Add all your files to the repository with
git add ., and commit them usinggit commit -m "Initial commit".
- Push Your Project to GitHub:
- In GitHub, create a new repository (without initializing it with a README, since you already have files).
- Copy the remote URL provided by GitHub and link your local repository to it by running:
git remote add origin <repository-URL>. - Push your changes to GitHub by running
git push -u origin master.
Using Git Branching for WordPress Development
One of Git’s most powerful features is branching. For example, if you’re developing a new feature for a WordPress theme, you can create a new branch to isolate your changes:
git checkout -b new-featureThis command creates a new branch named new-feature and switches to it. You can now work on your new feature without affecting the main codebase. Once you’re satisfied with the changes, you can merge the new branch back into the main branch:
git checkout master
git merge new-feature
Finally, push your updated code to GitHub:
git push origin masterCollaborating with Others Using GitHub
- Forking & Cloning: If you want to contribute to an open-source WordPress project on GitHub, you can fork the repository (creating a personal copy), clone it to your local machine, and start making changes.
- Pull Requests: When you’re ready to submit your changes to the main project, you can create a pull request. The project maintainers can review your changes and decide whether to merge them into the main branch.
When Should You Use Git & GitHub?
Git and GitHub are indispensable tools when:
- You want to keep a record of changes made to your WordPress themes, plugins, or custom code.
- You’re collaborating with other developers on a WordPress project.
- You want to back up your code online in case something happens to your local machine.
- You’re contributing to open-source WordPress plugins or themes.
Pro Tip
If you’re new to Git, learning basic commands like git add, git commit, and git push will be more than enough to get started. You can gradually explore more advanced features like branching and merging as you become more comfortable with version control.
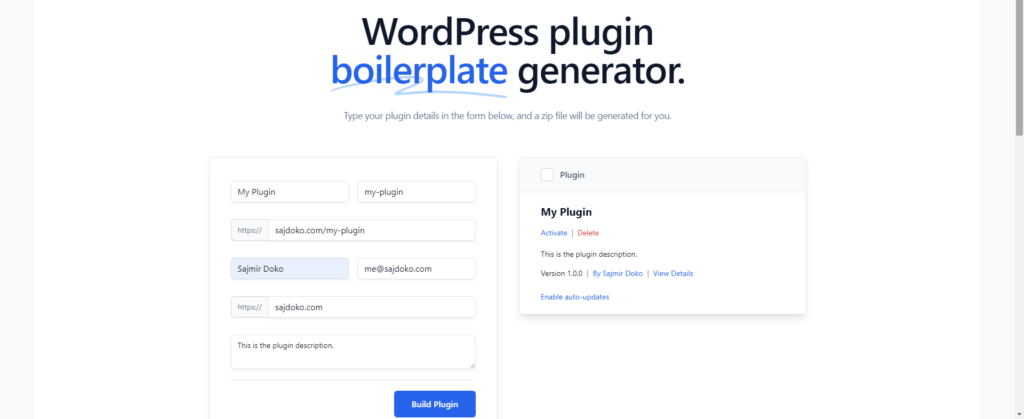
5. WordPress Plugin Boilerplate Generator
When you’re ready to start developing your own WordPress plugins, having a standardized structure for your code is essential. The WordPress Plugin Boilerplate Generator is an excellent tool that provides a foundation for building custom plugins. It follows WordPress coding standards and best practices, saving you from having to reinvent the wheel each time you start a new plugin project.
Why Use the WordPress Plugin Boilerplate Generator?
Developing a plugin from scratch can be daunting, especially for beginners. The Plugin Boilerplate Generator simplifies the process by providing a pre-built structure that adheres to WordPress’s best practices. This not only speeds up development but also ensures that your plugin remains maintainable and scalable over time. Whether you’re building a simple utility plugin or a more complex functionality, this tool offers a clean, consistent starting point.
Key Features of the WordPress Plugin Boilerplate Generator:
- Standardized Plugin Structure: The generator creates a well-organized file structure, including folders for admin, public, and includes functionality. This makes it easy to separate backend logic from front-end functionality.
- OOP (Object-Oriented Programming) Framework: The boilerplate follows an object-oriented approach, encouraging you to write modular, reusable code. This makes it easier to maintain and scale your plugin as it grows in complexity.
- WordPress Coding Standards: The generated code adheres to WordPress’s strict coding standards, which ensures that your plugin will be compatible with WordPress core updates and other plugins.
- Ready for Localization: The boilerplate includes built-in functionality for localization, making it easy to translate your plugin into multiple languages.
- Action and Filter Hooks: The boilerplate includes pre-set hooks for actions and filters, making it easy to hook into various parts of WordPress and customize behavior without modifying core files.
How to Generate a Plugin Using the WordPress Plugin Boilerplate Generator
- Visit the Plugin Boilerplate Generator Website: Head over to the WordPress Plugin Boilerplate Generator to start creating your plugin.
- Fill in Plugin Details:
- Enter the plugin name, description, author name, and other details as requested by the generator form.
- These details will automatically be added to the
plugin-name.phpfile, which contains the plugin’s metadata.
- Download Your Plugin: After filling in the details, click on the “Build Plugin” button. The generator will create a ZIP file containing the entire boilerplate structure for your new plugin.
- Install and Test:
- Upload the plugin ZIP file to your WordPress installation by navigating to Plugins > Add New > Upload Plugin.
- Activate the plugin and start customizing the files inside the
adminandpublicfolders to implement your functionality.
Understanding the Generated File Structure
The WordPress Plugin Boilerplate Generator creates a well-structured file hierarchy to organize your code. Here’s a breakdown of the most important folders and files:
- admin/: Contains all the code related to the WordPress admin panel. If your plugin includes settings pages or any other backend functionality, you’ll write that code in this folder.
- public/: This folder contains the code that runs on the front-end of the website. Any code related to how your plugin interacts with the website visitors (like shortcodes or frontend scripts) goes here.
- includes/: This folder holds the core classes and logic of your plugin, shared between both admin and public areas.
- plugin-name.php: The main file that WordPress uses to identify and initialize your plugin. It includes metadata (plugin name, description, version, etc.) and serves as the entry point for your plugin’s functionality.
- languages/: Holds translation files for your plugin, allowing users to translate it into different languages using WordPress’s built-in localization functions.
Benefits of Using the WordPress Plugin Boilerplate
- Speed Up Development: Instead of starting from scratch, the boilerplate gives you a pre-built structure, allowing you to focus on your plugin’s functionality rather than setting up the basics.
- Follow Best Practices: By using the boilerplate, you ensure that your code adheres to WordPress coding standards, making your plugin more secure, efficient, and compatible with WordPress core updates.
- Scalability: As your plugin grows in complexity, the modular structure provided by the boilerplate makes it easy to extend functionality without cluttering your codebase.
When Should You Use the WordPress Plugin Boilerplate?
This tool is perfect when:
- You’re building a new plugin from scratch and want a clean, structured starting point.
- You’re still learning WordPress plugin development and want to follow best practices from the get-go.
- You want to build plugins that are scalable and easy to maintain, especially in collaborative environments.
- You need to ensure that your plugin is ready for localization and easily extendable with action and filter hooks.
Pro Tip
While the boilerplate provides a great foundation, don’t forget to continuously test your plugin as you develop it. You can use tools like WP-CLI to automate testing or even write unit tests using PHPUnit to ensure that your plugin works as expected in different environments.
Wrapping up!
Mastering WordPress development doesn’t happen overnight, but using the right tools can dramatically improve your efficiency and productivity. Whether you’re working on local development, coding, debugging, version control, or plugin creation, the tools we’ve discussed—Local by Flywheel, Visual Studio Code, Chrome DevTools, Git & GitHub, and the WordPress Plugin Boilerplate Generator—are invaluable for WordPress developers of all skill levels.
By incorporating these tools into your workflow, you can streamline your development process, write cleaner code, and ensure your projects adhere to WordPress best practices. Plus, many of these tools have large communities, which means you’ll always have access to support, tutorials, and updates as you continue growing as a developer.
Start Building Today!
If you haven’t already, take some time to explore and experiment with each tool. Set up your local environment, familiarize yourself with version control, or try building your first custom plugin. Each step you take will bring you closer to becoming a confident and efficient WordPress developer.
Do you have any favorite tools that we didn’t mention? Let us know in the comments! And if you’re looking for more WordPress development tips, be sure to check out our blog for more articles and tutorials to help you on your journey.
Happy coding!
