Developing locally can sometimes feel cumbersome, especially when working with platforms like WordPress or Laravel on Windows. Fortunately, you can automate much of the setup process using PowerShell, streamlining your workflow and making local development both faster and less tedious. In this post, I’ll walk you through how I’ve automated key aspects of my local development environment setup using a PowerShell script. The script handles everything from updating hosts entries to configuring virtual hosts, creating databases, and even setting up SSL for your local domains.
Prerequisites
Before running the PowerShell script, ensure you have the following tools installed and configured:
- XAMPP: XAMPP provides a complete local server environment (Apache, MySQL, PHP) for Windows. Download it from apachefriends.org. After installation, confirm Apache and MySQL services are running. For a more detailed guide on setting up WordPress with XAMPP, check out this step-by-step guide.
- mkcert: A tool to create locally trusted SSL certificates. You’ll need this to generate certificates for your local domains. Install mkcert from GitHub, then run
mkcert -installto set up the root CA. - PowerShell: The script is designed to run in PowerShell, so make sure to launch PowerShell as Administrator, allowing the script to modify necessary system files.
Why Automate Local Setup?
Manually setting up a local environment requires repetitive tasks like creating directories, configuring virtual hosts, and setting up SSL certificates. Automating these processes can save time, prevent errors, and allow you to focus on what truly matters—developing your project. Here’s what the PowerShell script does for you:
- Adds a new host entry for the domain you’re working on.
- Sets up the directory structure for your project.
- Updates Apache’s virtual hosts configuration.
- Creates a new MySQL database.
- Generates SSL certificates for your local domain.
Automating these steps ensures that your environment setup is consistent and efficient, whether you’re working on multiple WordPress or Laravel projects.
Understanding the Workflow and PowerShell Script
Let’s break down the PowerShell script into blocks to explain its functionality:
Validating User Input
The first step is ensuring the script receives the correct input, such as the domain name and environment type (WordPress or Laravel).
function Validate-Input {
    param (
        [string]$domain,
        [string]$env
    )

    if ([string]::IsNullOrEmpty($domain)) {
        Write-Host "Domain name cannot be empty. Please enter a valid domain name." -ForegroundColor Red
        exit 1
    }

    if ($env -ne "w" -and $env -ne "l") {
        Write-Host "Invalid environment type. Please enter either 'w' for WordPress or 'l' for Laravel." -ForegroundColor Red
        exit 1
    }
}
This function ensures that both the domain name and environment type are provided correctly, preventing the script from running with invalid data.
Backing Up Configuration Files
Before modifying system files, it’s important to back them up. This ensures you can easily restore previous configurations if needed.
function Backup-File {
    param (
        [string]$filePath
    )

    if (Test-Path $filePath) {
        Copy-Item $filePath "$filePath.bak" -Force
        Write-Host "Backup of $filePath created." -ForegroundColor Green
    } else {
        Write-Host "File $filePath does not exist." -ForegroundColor DarkYellow
    }
}
By backing up the hosts and httpd-vhosts.conf files, this step helps safeguard against accidental misconfigurations.
Adding Hosts Entry
The script adds the local domain to your hosts file so that your browser can resolve the domain correctly.
function Add-Hosts-Entry {
    param (
        [string]$desiredIP = "127.0.0.1",
        [string]$hostname
    )

    $hostsFilePath = "$($Env:WinDir)\system32\Drivers\etc\hosts"
    $hostsFile = Get-Content $hostsFilePath

    Write-Host "About to add $desiredIP for $hostname to hosts file" -ForegroundColor Gray

    $escapedHostname = [Regex]::Escape($hostname)
    $patternToMatch = ".*$desiredIP\s+$escapedHostname.*"
    If (($hostsFile) -match $patternToMatch) {
        Write-Host "$hostname already exists in the hosts file." -ForegroundColor DarkYellow
    } Else {
        Write-Host "$hostname - adding to hosts file..." -ForegroundColor Yellow
        Add-Content -Encoding UTF8 $hostsFilePath ("$desiredIP".PadRight(20, " ") + "$hostname")
        Write-Host "$desiredIP $hostname added to hosts file."
    }
}
This block ensures the hosts file is updated correctly and prevents duplicate entries.
Editing Virtual Hosts Configuration
The script configures Apache’s virtual hosts file, making your project accessible via a custom domain in your browser.
function Edit-Vhosts-File {
    param (
        [string]$vhostsFile,
        [string]$domainDir,
        [string]$domain,
        [string]$env,
        [string]$certDir
    )

    $content = "@"

    <VirtualHost $domain.test:80>
    DocumentRoot "$domainDir"
    <Directory "$domainDir">
        Order allow,deny
        Allow from all
        AllowOverride All
    </Directory>
    ServerName $domain.test
    </VirtualHost>
    <VirtualHost $domain.test:443>
    DocumentRoot "$domainDir"
    <Directory "$domainDir">
        Order allow,deny
        Allow from all
        AllowOverride All
    </Directory>
    ServerName $domain.test
    SSLEngine On
    SSLCertificateFile "$certDir$domain.test.pem"
    SSLCertificateKeyFile "$certDir$domain.test-key.pem"
    </VirtualHost>
    "@

    if ($env -eq "l") {
        $content = $content -replace 'DocumentRoot "' + $domainDir + '"', 'DocumentRoot "' + $domainDir + '\public"'
        $content = $content -replace '<Directory "' + $domainDir + '">', '<Directory "' + $domainDir + '\public">'
    }

    $vhostsFileContent = Get-Content $vhostsFile -Raw
    if ($vhostsFileContent -contains "ServerName $domain.test") {
        Write-Host "$domain already exists in httpd-vhosts.conf." -ForegroundColor DarkYellow
        return
    }

    Add-Content -Path $vhostsFile -Value $content
    Write-Host "$domain added to httpd-vhosts.conf." -ForegroundColor Green
}
This step creates the necessary virtual host entries, adjusting the document root for Laravel projects as needed.
Creating the Project Directory
The script sets up the project directory structure:
function Create-Directory {
    param (
        [string]$path
    )

    if (-Not (Test-Path $path)) {
        New-Item -ItemType Directory -Path $path
        Write-Host "Directory $path created." -ForegroundColor Green
    } else {
        Write-Host "Directory $path already exists." -ForegroundColor DarkYellow
    }
}
This function ensures that the project’s directory is in place, making it easier to organize your files.
Creating the Database
The script automates the creation of a MySQL database, saving you from doing this manually in phpMyAdmin.
function Create-Database {
    param (
        [string]$databaseName
    )

    $dbCheck = mysql -u root -e "SHOW DATABASES LIKE '$databaseName';" 2>&1
    if ($dbCheck -match $databaseName) {
        Write-Host "Database $databaseName already exists." -ForegroundColor DarkYellow
        return
    }

    Write-Host "Creating database $databaseName..." -ForegroundColor Green
    Invoke-Expression "mysql -u root -e \"CREATE DATABASE $databaseName;\""
}
Generating SSL Certificates
Generating SSL certificates for local development is important when working with https://:
function Generate-SSL-Certificates {
    param (
        [string]$certDir,
        [string]$domain
    )

    if (Test-Path "$certDir$domain.test.pem") {
        Write-Host "SSL certificates for $domain already exist." -ForegroundColor DarkYellow
        return
    }

    Write-Host "Generating SSL certificates..." -ForegroundColor Green
    Set-Location $certDir
    Invoke-Expression "mkcert $domain.test"
}
This block automates the creation of SSL certificates for your local domains.
Restarting Apache
Finally, the script restarts Apache to apply the changes.
function Restart-Apache {
    Write-Host "Restarting Apache..."
    Invoke-Expression "C:\xampp\xampp_stop.exe"
    Start-Sleep -Seconds 5
    Invoke-Expression "C:\xampp\xampp_start.exe"
}
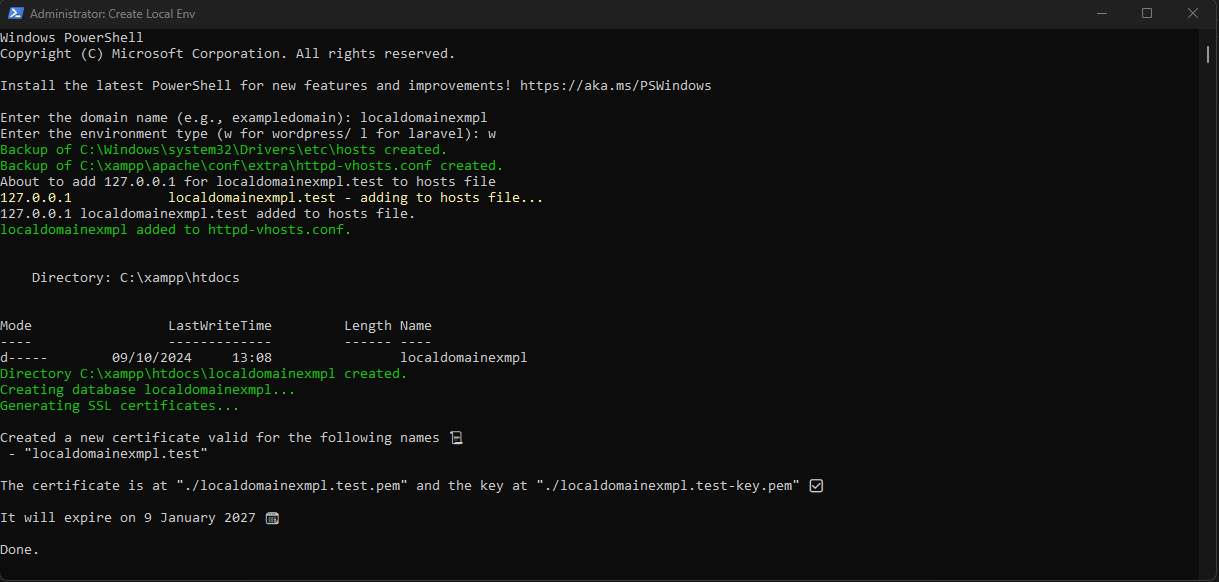
Running the Script
To execute the script:
- Open PowerShell as Administrator: The script modifies system files, so it needs elevated permissions.
- Run the Script: Navigate to the script’s directory and run it:
.\CreateLocalEnv.ps1This command sets up a WordPress environment at https://exampledomain.test.
Creating a Desktop Shortcut
To make running the script even easier, you can create a desktop shortcut that will run the script in PowerShell with administrator privileges. Here’s how:
- Create a Shortcut: Right-click on your desktop and go to New > Shortcut.
- Shortcut Target: In the “Type the location of the item” field, enter the following command:
powershell.exe -NoExit -ExecutionPolicy Bypass -File "C:\path\to\CreateLocalEnv.ps1"
Replace C:\path\to\CreateLocalEnv.ps1 with the actual path to your script.
- Name the Shortcut: Give your shortcut a name, such as “Create Local Environment”, and click Finish.
- Run as Administrator: Right-click on the newly created shortcut and select Properties. Go to the Shortcut tab, click Advanced, and check the box for Run as administrator. Click OK, and then Apply.
Benefits of Automating the Setup
- Consistency: Each setup is done the same way, reducing errors.
- Speed: Tasks are completed in seconds, letting you focus on coding.
- SSL Support: Easily create SSL certificates for local domains.
- Reduced Repetitive Tasks: Eliminating tedious setup steps allows you to spend more time on actual development.
Automating your local environment setup with PowerShell simplifies the process, reduces human error, and allows for more efficient development. The PowerShell script is available for download here. Feel free to adapt it to your own workflow, and let me know if you have any questions or suggestions in the comments!
