Setting up WordPress on your local machine is an excellent way to experiment with themes, plugins, and customizations without affecting a live site. In this guide, I’ll walk you through how to install WordPress on localhost using XAMPP. Let’s get started!
Step 1: Download and Install XAMPP
XAMPP is a free and open-source software that provides a local server environment for PHP and MySQL, both of which are required to run WordPress.
- Go to the XAMPP official website and download the appropriate version for your operating system (Windows, macOS, or Linux).
- Once downloaded, run the installer and follow the installation steps. Choose the default options unless you have specific requirements.
- During the installation, ensure that both Apache and MySQL are selected, as these are the essential services for WordPress.
Step 2: Start Apache and MySQL
After installation, open the XAMPP Control Panel. You’ll see several modules listed, including Apache and MySQL. These two modules need to be running to install and use WordPress.
- Click the Start button next to Apache to launch the local server.
- Click the Start button next to MySQL to launch the MySQL database server.
Both modules should now be running. You can confirm this by checking if their status is highlighted in green.
Step 3: Download WordPress
Next, you’ll need to download WordPress.
- Go to the WordPress.org download page and click the download button to get the latest version of WordPress.
- Once downloaded, extract the WordPress ZIP file. You should see a folder named
wordpress.
Step 4: Move WordPress to XAMPP’s htdocs Folder
Now that you have WordPress, you need to place it in the correct directory so that XAMPP can serve it as a website.
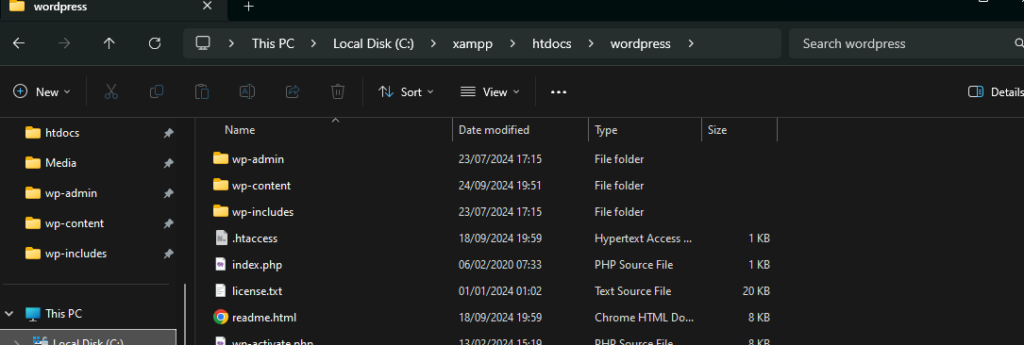
- Navigate to the directory where XAMPP is installed (commonly
C:\xamppon Windows or/Applications/XAMPPon macOS). - Find the
htdocsfolder inside the XAMPP directory. This is where you’ll place your WordPress files. - Copy the
wordpressfolder you extracted earlier into thehtdocsfolder. - You can rename the folder to anything you like (e.g.,
my-local-site), which will serve as the local URL for your site (e.g.,http://localhost/my-local-site).
Step 5: Create a MySQL Database for WordPress
WordPress needs a database to store its content. You can create a database through the XAMPP Control Panel.
- In the XAMPP Control Panel, click the Admin button next to MySQL. This will open phpMyAdmin, a web-based interface for managing MySQL databases.
- In phpMyAdmin, click the Databases tab at the top of the page.
- Under Create database, enter a name for your new database (e.g.,
wordpress_local). - Select utf8_general_ci as the collation (this is the recommended setting for WordPress).
- Click Create to finish creating the database.
Step 6: Configure WordPress
With your database ready, it’s time to configure WordPress to use it. Follow these steps:
- In your web browser, go to
http://localhost/your-folder-name(replaceyour-folder-namewith the name of the folder you placed insidehtdocs). - WordPress will prompt you to select a language. Choose your preferred language and click Continue.
- On the next screen, you’ll see a message that WordPress needs the database information. Click Let’s go!.
Enter Your Database Details
- Database Name: Enter the name of the database you created earlier (e.g.,
wordpress_local). - Username: Use
root(this is the default MySQL username in XAMPP). - Password: Leave this field blank (the default password for
rootin XAMPP is empty). - Database Host: Leave as
localhost. - Table Prefix: You can leave this as
wp_unless you are running multiple installations of WordPress on the same database.
Click Submit once you’ve filled out all the fields.
Step 7: Complete WordPress Installation
After submitting the database information, WordPress will check the connection and proceed to the installation screen. Follow these steps to complete the installation:
- Enter a Site Title (this can be changed later in the WordPress settings).
- Choose a Username, Password, and enter your email address.
- You can leave the checkbox for Discourage search engines from indexing this site unchecked since this is a local installation.
- Click Install WordPress to finish the installation.
Once the installation is complete, you’ll be prompted to log in to your new WordPress site. Use the username and password you just created.
Step 8: Access and Manage Your Local WordPress Site
Congratulations! You’ve successfully set up WordPress on localhost using XAMPP. You can now access your local WordPress site by navigating to http://localhost/your-folder-name in your browser.
- To manage the site, go to
http://localhost/your-folder-name/wp-adminand log in with the credentials you created during installation. - You can now start experimenting with themes, plugins, and customizations in a safe, local environment!
Troubleshooting Tips
If you run into any issues during setup, here are some common problems and solutions:
- Apache or MySQL won’t start: Ensure that no other programs are using the same ports (e.g., Skype or another server). You can change the default ports for Apache and MySQL in the XAMPP settings.
- Connection error during WordPress setup: Double-check that your database name, username, and password are correct. Ensure that MySQL is running in the XAMPP control panel.
